Wednesday, March 29, 2017
Managing Photos on your Desktop Linux Installation
Managing Photos on your Desktop Linux Installation
There are two major photo management software available on Linux
1.) F-Spot
2.) Google Picasa
While F-Spot is native Linux application written using mono libraries and actively
F-Spot : - F-Spot is a photo management software for Gnome Desktop environment in Linux , it has been created using C# language using Mono framework , it was started by Ettore Perazzoli and is now maintained by Larry Ewing . It is being developed by Novell , and inspite of being not a final stable 1.0 release it is packaged with a large number of Linux distributions including Mandriva,Ubuntu(Check) . F-Spot supports all major photographic image formats , including JPEG, PNG, TIFF, DNG and several vendor-specific RAW formats (CR2, PEF, ORF, SRF, CRW, MRW and RAF). Other supported file types are GIF, SVG and PPM. However, as of 2006, the RAW formats were not editable with F-Spot.
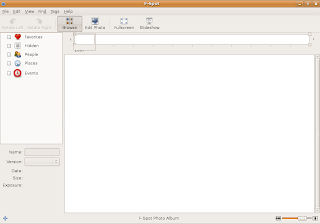 The Clean Default interface of F-Spot
The first thing that strikes you when you start using F-Spot is its clean simple interface , its interface is not jazzy as Google Picasa or iPhoto but simple enough to be usable . Now some would say comparison with Google Picasa is bit premature since it is still in early stage of development compared to Google Picasa which is mature final release , however it is powerful enough to be at least grouped with Google picasa and iPhoto .
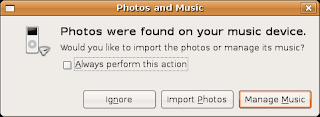 On connecting camera dialog box asking to import all photos in camera into F-Spot
Since it is default application for Photo Management in many Linux distributions , so on connecting camera or photo stick one gets option of loading images into F-Spot library.
 Timeline at top of F-Spot Interface
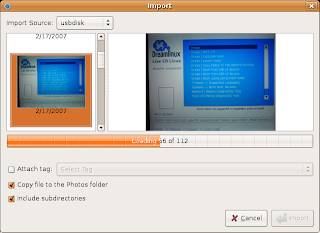 On selecting Import Source , dialog shows operation of adding images from source(USBDISK in this case) to F-Spot library
To add photos to F-Spot library chose (File->Import ) and select the folder you want to import , all the images in the folder are imported into F-Spot library and images are shown as thumbnail.
By default all the images imported into the F-Spot library are kept in $HOME/Photos (Photos directory in your home folder ) which is further subdivided into different months which is further divided into dates . All the photos taken on a particular date are grouped in same directory of that date .
F-Spot has a full-screen mode allowing you to view your photos on entire screen , There is also a slide show option which enables one to view all the images present in the F-Spot library as a slide-show (very similar to slide show of presentation programs) .
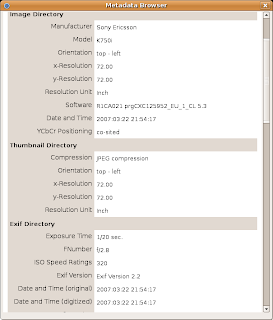 Meta Data dialog box showing information about image file
On Choosing a image you will find there is sliding bar at the bottom of a screen which allows you to conveniently zoom into or out of image .
F-Spot offers basic image editing features like Removing Red Eye , Cropping a selected area of image ,an interesting one - Converting Image to Black & White , Converting photos to sepia-tones adjusting colour , saturation hue , rotating image etc . However these image editing features are bit difficult to use and arent quite perfect you could use them for some light editing but i would recommend using Gimp for photo editing. Gimp has been around for quite some time and its features parallel those of photoshop and besides this it is free and comes preloaded with most Linux distributions .
Now besides organizing photos into different months and day , you can also organize photos using tags . Now by default F-Spot comes with four different tags ( Favorites , People , Hidden , Places ,Events ) you can also create more tags from (Tags -> Create tags) you can group one photo in more than on tag . Now i like this tag feature of organizing photo as this is like tags in blogs .You can tag different photos by dropping photos in the particular tag shown in the left side of screen or by dropping tags on photos .
Now besides organizing photos on the hard disk , you can also upload photos to Flickr which is an online photo library , Go to File -> Export -> upload to Flickr to upload photos to Flickr website .
Besides uploading photos to Flickr website you can also create a CD of your images by choosing File -> Export -> Export to CD option .Now F-Spot doesnt come with CD-Burning tool but uses Gnomes CD Burning tools to burn CD .
Overall F-Spot is a nice application that has a lot of potential , considering it is still in early version of development this is one application to look forward to , it is by no means perfect right now searching , image editing are some features that need a considerable amount of improvement but overall it is pretty usable .
Google Picasa : - Google Picasa is one of the more user friendly photo management software available , it is available on both Windows and Linux . It runs on Linux on top of Application Layer called Wine that allows Windows application to run on Linux . However this has some disadvantage firstly some windows application dont work as well as they do on windows , there are occasional application crashes, application freezes , also UI is bit less responsive however applications are still usable .
Anyways Google Picasa isnt shipped with most of the Linux distributions also you are unlikely to find it in repositories of various Linux distribution since it is a commercial close source product . Anyways you can get Google Picasa from the following website address : - http://picasa.google.com/linux . however it still in beta stage on Linux platform .
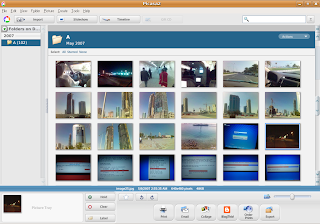 This is how Picasa Looks
The first thing that you notice when you run Google Picasa for first time is its user friendly interface ,its one of the better looking application thats available on Linux .The first time you start Picasa it asks for location where it should start looking for images and catalog them , now it offers only two option either to scan entire hard disk or only desktop , this is something which could be improved there should be another option of scanning particular folders instead of entire hard disk anyways after you specify one of the two options images are loaded into Picasa library .
Since Picasa is windows application running on Linux maybe because of this reason i found Picasa interface somewhat slow on my old laptop(Cel 1.4 GHz 256 Megabytes of ram ) now if you compare speed F-Spot beats Picasa hands down. Also the interface wasnt very responsive i had hell of a difficulty moving sidebars ():)
After the scanning, adding of images to library is over all the images along with folder they were contained in are shown in ascending order of date when they were created . All the images in the library are shown as thumbnail allowing easy browsing of images. Now one thing that was interesting was you could change the size of thumbnails ,by moving the slide bar at the bottom of interface , this is particularly useful if you have large amount of image files and you want to see maximum number of image files at once .
Picasa offers a number of image editing features like color enhancement , red eye reduction , cropping images to particular size etc . Now when you select a image you get a screen similar to this offering a variety of image enhancement features which you could use to improve quality of image .
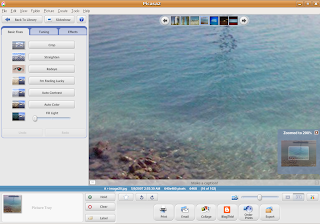 After selecting a image you can easily zoom into or out of image using slide bar at bottom of interface
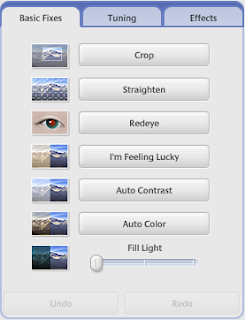
Basic Fixes has the following enhancements : -
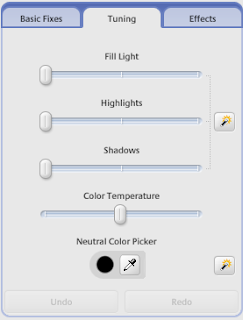
 Tuning provides the following options : -
Effects provide a number of different effects to modify the features of photo : -
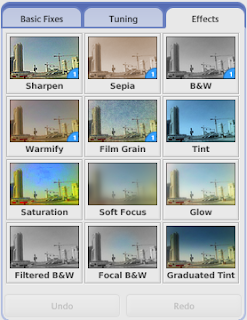
Now large number of image editing features are available in Picasa and there shouldnt be any need for any external image editing program .
At the bottom of interface you would find buttons allowing you to easily Print , Blog ,Email ,Collage Photos there are number of other features which are not being documented here .
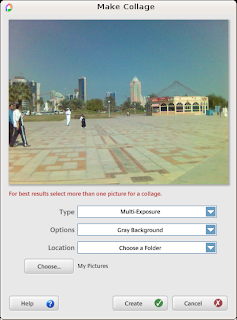 Picasa Make Collage Feature
Now i tried Blogthis button but to my dismay this feature didnt seem to work. However Print and Email photos did work well. I was pleasantly surprised to note that Picasa offered to Email photos using Gmail account apart from allowing using POP3 accounts and some Picasa Mail(Couldnt check it out) ,this can be really helpful for someone without a POP3 account(most of us) .
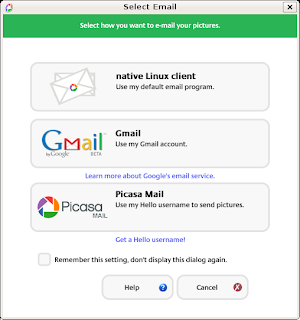 Picasa Email Feature
Besides all the image editing features , you can also view images in the library as slide show or screen saver .
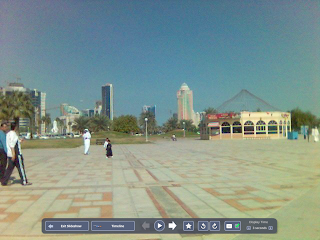 A Slide-Show Session in Progress
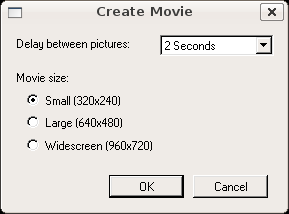
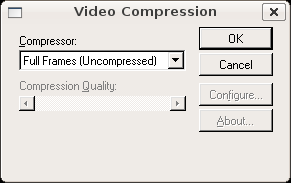
After pressing ok button you will find another dialog box similar to this asking for some other details on pressing "OK" movie of the images selected would be created. As mentioned before the movie created is in AVI Format .
Another great feature i really liked in Picasa was Export as Web Page feature , on selecting a group of images from the library and selecting Folder -> Export as Webpage or Pressing (Ctrl + W) you will get a couple of dialog boxes asking for how web page should look after completing these steps you would find all the images shown in the default web browser as web page which then could be uploaded .
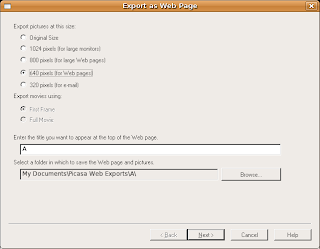 Dialog box asking for image size in web page
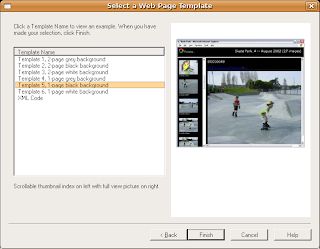 Dialog box asking which template to use for web page(How web page should look)
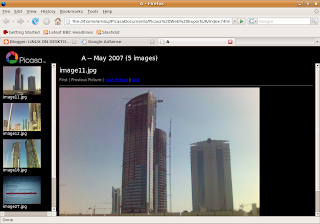 Finally this is how web page of selected images looks
Overall Picasa is an extremely professional application for Photo Management that provides a host of impressive features ,it is availability of quality applications like picasa that encourages people to use Linux on desktop . However picasa is still a Windows application that runs on Linux using compatibility layer and so there are some minor issues with application stability and it would be really nice to see Google develop native version of Picasa for Linux .
(C) 2007, Ambuj Varshney
For Linux On Desktop Blog (http://linuxondesktop.blogspot.com)
Available link for download


Tuesday, February 28, 2017
Menghafal Perintah Command Line Linux
Menghafal Perintah Command Line Linux
laelamadjnun@laelamadjnun-laptop:~$ mati
1. laelamadjnun@laelamadjnun-laptop:~$ cp .bachrc .bachrc.old ---> dengan tujuan kalo terjadi
error pada .bachrc dapat di kembalikan lagi
2. laelamadjnun@laelamadjnun-laptop:~$ gedit .bachrc --> membuka file .bachrc dengan editor
gedit
3. ketik di paling bawah kalimat berikut
alias mati=halt4. kalo sudahselesai bisa di simpan dengan menekan kombinasi keyboard ctrl+s
alias kosong=clear
alias nembel=apt-get update
alias install=apt-get install
alias restart=reboot
5. kemudian yang terakhir jalankan perintah berikut pada Terminal untuk menerapkan perubahan
pada file .bashrc yang baru saja kita edit.
laelamadjnun@laelamadjnun-laptop:~$source ~/.bashrc6. kemudian ita coba apakan alias/variable yang kita buat bekerja, kalo perintah tersebut bekerja
maka akan seperti gambar berikut:

itulah tadi sebuah fungsi yang memudahkan kita dalam menghafal perintah-perintah di linux, semoga artikel ini berguna dan memudahkan bagi anda yang sedang belajar linux.status : Dokumentasi
Sumber : Veron
Available link for download
Sunday, February 19, 2017
Mengembalikan Grub loader pd linux
Mengembalikan Grub loader pd linux
disini saya memberi judul Menginstal Grub Loader pada Linux, kronologi dari awal seperti ini, saya pertama kali OS yang terintal di laptop saya adalah Windows, kemudian saya dualboot dengan UBUNTU tidak terjadi masalah karena windows terinstall dulu, misalkan saya balik UBUNTU dulu yang di install kemudian baru WINDOWS ini baru bermasalah, karena boot loader UBUNTU tertutup oleh Bootloader windows, akan tetapi kita bisa menginsttal grub linuxnya saja tanpa harus menginstall ulang lagi dengan cara dibawah ini :
2. Setelah masuk ke desktop, masuk ke terminal (Alt+F2, gnome-terminal)
3. Masuklah sebagai root
sudo -i
4. Cek partisi yang ada di harddisk
fdisk -l
5. Cari partisi tempat grub Linux terinstal, misalnya saja di /dev/sda5
Disk /dev/sda: 320.1 GB, 320072933376 bytes
255 heads, 63 sectors/track, 38913 cylinders
Units = cylinders of 16065 * 512 = 8225280 bytes
Disk identifier: 0xb5bcb5bc
Device Boot Start End Blocks Id System
/dev/sda1 * 1 12972 104189952 7 HPFS/NTFS
/dev/sda2 12972 25943 104189952 7 HPFS/NTFS
/dev/sda3 25943 36885 87897834+ 7 HPFS/NTFS
/dev/sda4 36886 38913 16289910 5 Extended
/dev/sda5 36886 38670 14337981 83 Linux
/dev/sda6 38671 38913 1951866 82 Linux swap / Solaris
6. Mount partisi tersebut dengan membuat mountpoint terlebih dahulu
mkdir /mnt/linux
mount /dev/sda5 /mnt/linux
7. Install grub di harddisk (bukan di partisi) (^_^)
grub-install –root-directory=”/mnt/linux” /dev/sda
setelah itu kita kita harus seting uuid
ketik ls -l /dev/disk/by-uuid
lihat uuid windows berapa dan copy
pastekan ke---->
ketik gedit /boot/grub/grub.cfg
cari uuid windowsnya dan paste_kan
--> kalo kamu masih bingung dengan tutorial di atas dah ku buatin e-booknya
--> silahkan download
di
Available link for download
Friday, November 4, 2016
Making Music Beats on Linux Ubuntu with Hydrogen
Making Music Beats on Linux Ubuntu with Hydrogen
I am going to review a couple of Music Making Softwares for Linux and am starting with the simplest and one of the best!HYDROGEN. Hydrogen basically is a pattern based drum programming software which in layman terms means, it allows you to make your own beats.And in case you arent much into music, you might be wondering “what the hell will i do with this piece of software”...well here is a word from my friends whove tried this: “Its pretty fun playing with this software, n even without knowing much, you could actually MAKE SUM MUSIC!!!”
About the software:(technical:from the softwares website itself!)
- General
- Very user-friendly, modular, fast and intuitive graphical interface based on QT 3.
- Sample-based stereo audio engine, with import of sound samples in .wav, .au and .aiff formats.
- Support of samples in compressed FLAC file.
- Sequencer and mixer
- Pattern-based sequencer, with unlimited number of patterns that can be chained into a song!
- Up to 64 ticks per pattern with individual level per event and variable pattern length.
- 32 instrument tracks with volume, mute, solo, pan capabilities.
- Multi layer support for instruments (up to 16 samples for each instrument).
- Ability to import/export song files.
- Unique human velocity, human time, pitch and swing functions.
- Multiple patterns playing at once.
- Other
- JACK, ALSA, PortAudio and OSS audio drivers.
- ALSA MIDI and PortMidi input with assignable midi-in channel (1..16, ALL).
- Import/export of drumkits.
- Export song to wav file.
- Export song to midi file.
Some more nice points about Hydrogen that Ive collected:
- Ardour (another Linux DAW) supports import of Hydrogen files directly...n even some other softwares are implimenting support to its song format...
- There are plenty of drumkits and drumloops available all for FREE in the Hydrogen community.
- Support for LADSPA plugins, that let you add more effects for your beats!
- Its cross platform, so you dont have to bother about losing your audio data when you switch between operating systems(i found this point really useful!)
- Really lightweight, so you can happily work on Hydrogen and other music making software simultaneously!
- Best of all: Its completely FREE!
 This is how HYDROGEN looks
Installation:
To install Hydrogen issue the following command in the terminal window (Applications -> Accessories -> Terminal)
sudo apt-get install hydrogenthat will install the basic hydrogen with a default drum kit..if you want a few more drum kits(actually a lot more!) issue the following command in the terminal window.
sudo apt-get install hydrogen-drumkitsNow that youve got the software installed, you can find it in the (Applications-> Sound & Video)
Simple Tutorial: (for people with absolutely no knowledge about making music!!!)
Well those people who already know a bit of music making and create electronic music, I m sure you guys will definitely know how to get some help for yourself..for you guys this tutorial is nothing more than a stupid long procedure to introduce the hydrogens interface...this tutorial is intended for all those, who want to make music, but know nothing about its technical aspects, and want some initiation to get started.
And in case you need some initiation: here is
U2s song, Sunday Bloody Sunday s drum beat..(taken from: http://briansbedroom.blogspot.com/search/label/hydrogen)
Some more drum loops:
http://www.freesound.org/packsViewSingle.php?id=1950
Or simply checkout the Hydrogens Demo song from its file menu! Open it and click play...
First lets get comfortable with the interface:
Here are a few tips that might help you.
1)As per the Hydrogens interface, basically every beat(song) you make in it comprises of “Patterns”.
2)The pattern editor is where you can edit each individual pattern.
3)The song editor is where you can arrange your patterns...(which comes when and along with which others!)
4)The mixer is where you control the volume(of both:the individual instruments and the master volume)
5)The Bar Below with the buttons: is the main control bar..here you can set the tempo, and mode(which one to play?either the individual pattern or the whole song itself...)and a couple more features...
6)You can toggle the visibility of the various windows inside from the View menu.
 Step 1: Listen to the completed song.
http://saidinesh5.googlepages.com/Reallysimpleturorial.h2song
open the file and simply click the play button!
I know it sounds crazy to even call this a song but, for a newbie, this was the simplest thing that i can think of...
Step 2:Create the song:
Basically the song comprises of 2 patterns:Pattern 1 and Pattern 2, one comes after the other and in Pattern 1: click on the lines on the grid to make black marks appear as shown in the screen shot. To put a mark, simply click on the vertical lines.(click on the mark to remove it) the resolution option on the top of the box, lets you see how dense you want your lines to be packed:(for this tutorial, let it be at 16) the higher the resolution, the more the lines you see.I suggest you play a bit with the resolution and you will understand what i am saying.
Set the tempo to 90bpm(beats per minute). Click on the tempo place shown in the screen shot and set the value.
The Pattern number and Name beside the resolution options shows us which pattern we are editing.For (y)our song we need to bother only about 2 patterns, so i chose Pattern 1 and Pattern 2 . So You have to make the pattern 1 and pattern 2 as shown below:


and now you have to place both the patterns in the song editor as:same principle again:clicking on the boxes toggles btw. The blue box means that that pattern will be playin during that time in the song....
 Step 3:
and now its time to listen to what you have made!!!Simply click on the play button (make sure that song mode is selected)...
You might not be that impressed at your first creation, but trust me thats just the “hello world” program for you!. All i wanted to do with this tutorial was to create a basic motivation towards making music and am sure you will build upon this.I myself am no master at making music. infact what i just showed you was born from a lot of trial and error experiments, its been a lot of time fiddling with my computer and my keyboard to teach myself a bit of musical concepts and make some good music and i know there is a lot to do, in order to produce professional beats...and basically good music..
I am also including a few resources that might help you learn a bit more....
Hydrogens homepage
http://www.hydrogen-music.org/
Why should i leave out the really good tutorial in hydrogens documentation???check out the hydrogens help menu!!
A series of articles for people who want to learn more about hydrogen and make really good beats...
http://briansbedroom.blogspot.com/search/label/hydrogen
All d best n Happy Making Beats!!!
Article Written by : Sai Dinesh (saidinesh5@gmail.com)
For Desktop on Linux Blog , http://linuxondesktop.blogspot.com
(C) 2008 , Sai Dinesh
Available link for download
Monday, October 31, 2016
Make a bootable Linux in the Flashdisk
Make a bootable Linux in the Flashdisk

Make a bootable Linux Live CD Ubuntu 7.10 in the Flashdisk through the windows was not as hard as we imagine, the steps - steps are as follows:
- Download the file first syslinux here
- Create a directory on the C syslinux:
- Then extract the files we had downloaded to the folder C: syslinux
- In the command promt windows into direktory c : syslinux Win32
- Use the following command to create a usb bootable disk can be as: syslinux-s F: (assuming the usb drive in F)
- The next step is copying all the files in Ubuntu Live CD 7:10 into the USB, you should use the command xcopy / e / h / KD: *.* f: (D as a CD-ROM).
Furthermore, the USB flash already in use.^_^
Available link for download