


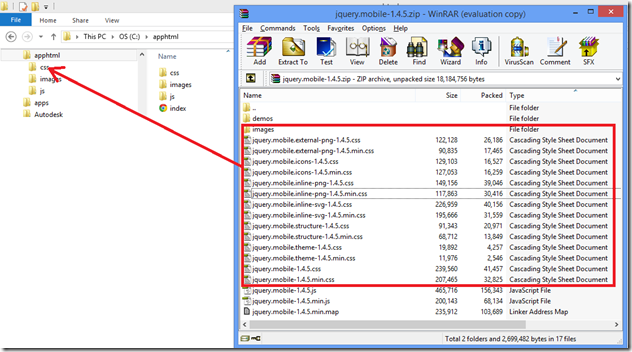
 The css files copied to your css folder.
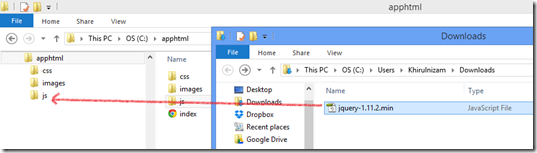


Membuat Simbol Matematika, Huruf Yunani, dan Simbol Lainnya dengan Kode HTML - Sebelumnya di blog ini telah diulas mengenai cara membuat simbol atau karakter khusus dengan menggunakan kode HTML pada posting yang berjudul Cara Membuat Karakter-karakter Khusus dalam Postingan. Namun, pada artikel tersebut hanya dibahas beberapa simbol saja.
Kali ini masih akan membahas tentang cara membuat simbol menggunakan kode HTML tetapi dengan jumlah simbol yang lebih banyak. Baik dengan kode HTML yang berupa angka maupun kode HTML dengan huruf atau kata. Kedua kode tersebut menghasilkan simbol yang sama di bagian "Compose" atau setelah posting dipublikasikan. Yang harus diingat adalah menuliskan kode tersebut pada bagian "HTML".
Simbol-simbol ini terbagi menjadi 3 kelompok tabel. Tabel yang pertama memuat simbol-simbol yang berhubungan dengan matematika. Tabel yang kedua berisi simbol dan tulisan Yunani. Sedangkan tabel yang terakhir memuat simbol-simbol yang lainnya.
Berikut 3 tabel yang memuat simbol-simbol beserta kode HTML-nya. Selamat menyimak dan semoga bermanfaat.
I. SIMBOL MATEMATIKA
II. HURUF YUNANI
III. SIMBOL-SIMBOL LAINNYA
Kali ini masih akan membahas tentang cara membuat simbol menggunakan kode HTML tetapi dengan jumlah simbol yang lebih banyak. Baik dengan kode HTML yang berupa angka maupun kode HTML dengan huruf atau kata. Kedua kode tersebut menghasilkan simbol yang sama di bagian "Compose" atau setelah posting dipublikasikan. Yang harus diingat adalah menuliskan kode tersebut pada bagian "HTML".
Simbol-simbol ini terbagi menjadi 3 kelompok tabel. Tabel yang pertama memuat simbol-simbol yang berhubungan dengan matematika. Tabel yang kedua berisi simbol dan tulisan Yunani. Sedangkan tabel yang terakhir memuat simbol-simbol yang lainnya.
Berikut 3 tabel yang memuat simbol-simbol beserta kode HTML-nya. Selamat menyimak dan semoga bermanfaat.
I. SIMBOL MATEMATIKA
| SIMBOL | HTML ANGKA | HTML KATA | KETERANGAN |
? | ∀ | ∀ | for all |
? | ∂ | ∂ | part |
? | ∃ | &exists; | exists |
? | ∅ | ∅ | empty |
? | ∇ | ∇ | nabla |
? | ∈ | ∈ | isin |
? | ∉ | ∉ | notin |
? | ∋ | ∋ | ni |
? | ∏ | ∏ | prod |
? | ∑ | ∑ | sum |
? | − | − | minus |
? | ∗ | ∗ | lowast |
? | √ | √ | square root |
? | ∝ | ∝ | proportional to |
? | ∞ | ∞ | infinity |
? | ∠ | ∠ | angle |
? | ∧ | ∧ | and |
? | ∨ | ∨ | or |
? | ∩ | ∩ | cap |
? | ∪ | ∪ | cup |
? | ∫ | ∫ | integral |
? | ∴ | ∴ | therefore |
? | ∼ | ∼ | simular to |
? | ≅ | ≅ | approximately equal |
? | ≈ | ≈ | almost equal |
? | ≠ | ≠ | not equal |
? | ≡ | &equip; | equivalent |
? | ≤ | ≤ | less or equal |
? | ≥ | ≥ | greater or equal |
? | ⊂ | ⊂ | subset of |
? | ⊃ | ⊃ | superset of |
? | ⊄ | ⊄ | not subset of |
? | ⊆ | ⊆ | subset or equal |
? | ⊇ | ⊇ | superset or equal |
? | ⊕ | ⊕ | circled plus |
? | ⊗ | ⊗ | circled times |
? | ⊥ | ⊥ | perpendicular |
? | ⋅ | ⋅ | dot operator |
II. HURUF YUNANI
| KARAKTER | HTML ANGKA | HTML KATA | KETERANGAN |
| ? | Α | Α | Alpha |
| ? | Β | Β | Beta |
| ? | Γ | Γ | Gamma |
| ? | Δ | Δ | Delta |
| ? | Ε | Ε | Epsilon |
| ? | Ζ | Ζ | Zeta |
| ? | Η | Η | Eta |
| ? | Θ | Θ | Theta |
| ? | Ι | Ι | Iota |
| ? | Κ | Κ | Kappa |
| ? | Λ | Λ | Lambda |
| ? | Μ | Μ | Mu |
| ? | Ν | Ν | Nu |
| ? | Ξ | Ξ | Xi |
| ? | Ο | Α | Omicron |
| ? | Π | Π | Pi |
| ? | Ρ | Ρ | Rho |
| ? | Σ | Σ | Sigma |
| ? | Τ | Τ | Tau |
| ? | Υ | Υ | Upsilon |
| ? | Φ | Φ | Phi |
| ? | Χ | Χ | Chi |
| ? | Ψ | Ψ | Psi |
| ? | Ω | Ω | Omega |
| ? | α | α | alpha |
| ? | β | β | beta |
| ? | γ | γ | gamma |
| ? | δ | δ | delta |
| ? | ε | ε | epsilon |
| ? | ζ | ζ | zeta |
| ? | η | η | eta |
| ? | θ | θ | theta |
| ? | ι | ι | iota |
| ? | κ | κ | kappa |
| ? | λ | λ | lambda |
| ? | μ | μ | mu |
| ? | ν | ν | nu |
| ? | ξ | ξ | xi |
| ? | ο | ο | omicron |
| ? | π | π | pi |
| ? | ρ | ρ | rho |
| ? | σ | σ | sigma |
| ? | τ | τ | tau |
| ? | υ | υ | upsilon |
| ? | φ | φ | phi |
| ? | χ | χ | chi |
| ? | ψ | ψ | psi |
| ? | ω | ω | omega |
| ? | ϑ | ϑ | theta symbol |
| ? | ϒ | ϒ | upsilon symbol |
| ? | ϖ | ϖ | pi symbol |
III. SIMBOL-SIMBOL LAINNYA
| SIMBOL | HTML ANGKA | HTML KATA | KETERANGAN |
| Π| Π| Π| capital ligature OE |
| œ | œ | œ | small ligature oe |
| Š | Š | Š | capital S with caron |
| š | š | š | small S with caron |
| Ÿ | Ÿ | Ÿ | capital Y with diaeres |
| ƒ | ƒ | ƒ | f with hook |
| ˆ | ˆ | ˆ | modifier letter |
| ˜ | ˜ | ˜ | small tilde |
|   |   | en space | |
|   |   | em space | |
|   |   | thin space | |
| ? | ‌ | ‌ | zero width non-joiner |
| ? | ‍ | ‍ | zero width joiner |
| ? | ‎ | ‎ | center-to-right mark |
| ? | ‏ | ‏ | right-to-center mark |
| – | – | – | en dash |
| — | — | — | em dash |
| ‘ | ‘ | ‘ | center single quotation mark |
| ’ | ’ | ’ | right single quotation mark |
| ‚ | ‚ | ‚ | single low-9 quotation mark |
| “ | “ | “ | center double quotation mark |
| ” | ” | ” | right double quotation mark |
| „ | „ | „ | double low-9 quotation mark |
| † | † | † | dagger |
| ‡ | ‡ | ‡ | double dagger |
| • | • | • | bullet |
| … | … | … | horizontal ellipsis |
| ‰ | ‰ | ‰ | per mille |
| ? | ′ | ′ | minutes |
| ? | ″ | ″ | seconds |
| ‹ | ‹ | ‹ | single center angle quotation |
| › | › | › | single right angle quotation |
| ? | ‾ | ‾ | overline |
| € | € | &uero; | uero |
| ™ | ™ | ™ | trademark |
| ? | ← | ← | left arrow |
| ? | ↑ | ↑ | up arrow |
| ? | → | → | right arrow |
| ? | ↓ | ↓ | down arrow |
| ? | ↔ | ↔ | left right arrow |
| ? | ↵ | ↵ | carriage return arrow |
| ? Available link for download .png)

Thursday, December 15, 2016Saturday, November 12, 2016mengatasi because of security error htmlmengatasi because of security error htmlBagi anda yang menggunakan fasilitas Remote Desktop Connection atau biasa disebut RDP (Remote Desktop Protocol) di Windows, tentunya sangat dimudahkan dalam bekerja karena dapat mengakses remote komputer dengan tampilan GUI (Graphical User Interface) persis sama seperti kita berada di depan komputer aslinya yang diremote tersebut. Pernahkah anda mengalami atau ada beberapa komputer/server di tempat anda yang tidak bisa diremote dengan keterangan : Because of a security error, the client could not connect to the remote computer, Verify that you are logged on to the network, and then try connecting again ?. Di komputer saya ini terjadi ketika akan Remote desktop ke Windows 2008, sedangkan komputer yang dipakai untuk meremote (client) menggunakan Windows XP dan Windows Server 2003.  Sulusinya : Perhatikan Versi Remote Desktop Connection (Terminal Services Client) Cara untuk melihat versi remote desktop lihat di link ini Silakan upgrade versi Remote Desktop Connection / Terminal Services Client (pada komputer yang dipakai buat meremote). Caranya mudah tinggal download dan instal kb 925876 dari Microsoft dengan alamat: http://support.microsoft.com/kb/925876 Pilih update sesuai dengan OS client komputernya, Window XP atau Windows Server 2003, 32 bit atau 64 bit. sumber : http://www.tipstriks.com/2013/12/mengatasi-because-of-security-error.htmlAvailable link for download
Saturday, November 5, 2016Menulis kode HTML dipostingan blogMenulis kode HTML dipostingan blogKode HTML yaitu sebuah kode yang digunakan untuk membuat bentuk/membaca sebuah berupa benda atau gadgaet yang nantinya akan tampil dipostingan blog kamu. Nah, Code converter dipergunakan untuk mem-parse atau mengubah kode html agar bisa ditampilkan dalam bentuk postingan. Tujuannya agar kode tersebut tidak dianggap perintah oleh system. Code converter ini sangat berguna bagi sahabat blogger yang sering berurusan dengan kode-kode yang harus di posting pada blog. Bagi yang ingin memasang Code Converter sebagai tool pada blognya seperti pada blog ini, silahkan copas kode berikut: <script src="http://www.gmodules.com/ig/ifr?url=http://hosting.gmodules.com/ig/gadgets/file/102462998830435293579/post-Code.xml&up_grows=10&up_conv1=1&up_conv2=1&up_conv3=1&up_conv4=1&up_conv5=1&synd=open&w=315&h=200&title=Post-Code%3A+code+converter&border=http%3A%2F%2Fwww.gmodules.com%2Fig%2Fimages%2F&output=js"> </script> Maka hasilnya akan tampil seperti dibawah ini. Available link for download
Subscribe to:
Posts (Atom)
|