Wednesday, March 29, 2017
Managing Photos on your Desktop Linux Installation
Managing Photos on your Desktop Linux Installation
There are two major photo management software available on Linux
1.) F-Spot
2.) Google Picasa
While F-Spot is native Linux application written using mono libraries and actively
F-Spot : - F-Spot is a photo management software for Gnome Desktop environment in Linux , it has been created using C# language using Mono framework , it was started by Ettore Perazzoli and is now maintained by Larry Ewing . It is being developed by Novell , and inspite of being not a final stable 1.0 release it is packaged with a large number of Linux distributions including Mandriva,Ubuntu(Check) . F-Spot supports all major photographic image formats , including JPEG, PNG, TIFF, DNG and several vendor-specific RAW formats (CR2, PEF, ORF, SRF, CRW, MRW and RAF). Other supported file types are GIF, SVG and PPM. However, as of 2006, the RAW formats were not editable with F-Spot.
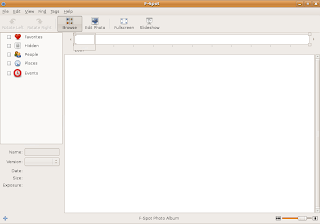 The Clean Default interface of F-Spot
The first thing that strikes you when you start using F-Spot is its clean simple interface , its interface is not jazzy as Google Picasa or iPhoto but simple enough to be usable . Now some would say comparison with Google Picasa is bit premature since it is still in early stage of development compared to Google Picasa which is mature final release , however it is powerful enough to be at least grouped with Google picasa and iPhoto .
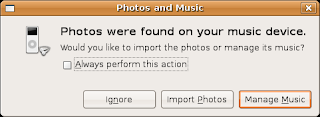 On connecting camera dialog box asking to import all photos in camera into F-Spot
Since it is default application for Photo Management in many Linux distributions , so on connecting camera or photo stick one gets option of loading images into F-Spot library.
 Timeline at top of F-Spot Interface
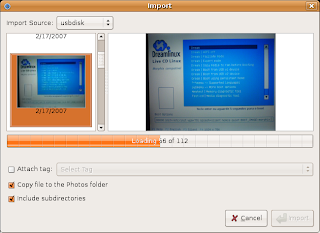 On selecting Import Source , dialog shows operation of adding images from source(USBDISK in this case) to F-Spot library
To add photos to F-Spot library chose (File->Import ) and select the folder you want to import , all the images in the folder are imported into F-Spot library and images are shown as thumbnail.
By default all the images imported into the F-Spot library are kept in $HOME/Photos (Photos directory in your home folder ) which is further subdivided into different months which is further divided into dates . All the photos taken on a particular date are grouped in same directory of that date .
F-Spot has a full-screen mode allowing you to view your photos on entire screen , There is also a slide show option which enables one to view all the images present in the F-Spot library as a slide-show (very similar to slide show of presentation programs) .
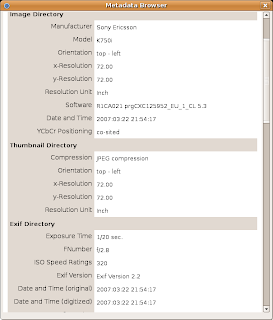 Meta Data dialog box showing information about image file
On Choosing a image you will find there is sliding bar at the bottom of a screen which allows you to conveniently zoom into or out of image .
F-Spot offers basic image editing features like Removing Red Eye , Cropping a selected area of image ,an interesting one - Converting Image to Black & White , Converting photos to sepia-tones adjusting colour , saturation hue , rotating image etc . However these image editing features are bit difficult to use and arent quite perfect you could use them for some light editing but i would recommend using Gimp for photo editing. Gimp has been around for quite some time and its features parallel those of photoshop and besides this it is free and comes preloaded with most Linux distributions .
Now besides organizing photos into different months and day , you can also organize photos using tags . Now by default F-Spot comes with four different tags ( Favorites , People , Hidden , Places ,Events ) you can also create more tags from (Tags -> Create tags) you can group one photo in more than on tag . Now i like this tag feature of organizing photo as this is like tags in blogs .You can tag different photos by dropping photos in the particular tag shown in the left side of screen or by dropping tags on photos .
Now besides organizing photos on the hard disk , you can also upload photos to Flickr which is an online photo library , Go to File -> Export -> upload to Flickr to upload photos to Flickr website .
Besides uploading photos to Flickr website you can also create a CD of your images by choosing File -> Export -> Export to CD option .Now F-Spot doesnt come with CD-Burning tool but uses Gnomes CD Burning tools to burn CD .
Overall F-Spot is a nice application that has a lot of potential , considering it is still in early version of development this is one application to look forward to , it is by no means perfect right now searching , image editing are some features that need a considerable amount of improvement but overall it is pretty usable .
Google Picasa : - Google Picasa is one of the more user friendly photo management software available , it is available on both Windows and Linux . It runs on Linux on top of Application Layer called Wine that allows Windows application to run on Linux . However this has some disadvantage firstly some windows application dont work as well as they do on windows , there are occasional application crashes, application freezes , also UI is bit less responsive however applications are still usable .
Anyways Google Picasa isnt shipped with most of the Linux distributions also you are unlikely to find it in repositories of various Linux distribution since it is a commercial close source product . Anyways you can get Google Picasa from the following website address : - http://picasa.google.com/linux . however it still in beta stage on Linux platform .
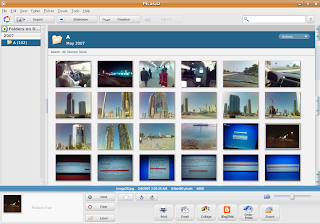 This is how Picasa Looks
The first thing that you notice when you run Google Picasa for first time is its user friendly interface ,its one of the better looking application thats available on Linux .The first time you start Picasa it asks for location where it should start looking for images and catalog them , now it offers only two option either to scan entire hard disk or only desktop , this is something which could be improved there should be another option of scanning particular folders instead of entire hard disk anyways after you specify one of the two options images are loaded into Picasa library .
Since Picasa is windows application running on Linux maybe because of this reason i found Picasa interface somewhat slow on my old laptop(Cel 1.4 GHz 256 Megabytes of ram ) now if you compare speed F-Spot beats Picasa hands down. Also the interface wasnt very responsive i had hell of a difficulty moving sidebars ():)
After the scanning, adding of images to library is over all the images along with folder they were contained in are shown in ascending order of date when they were created . All the images in the library are shown as thumbnail allowing easy browsing of images. Now one thing that was interesting was you could change the size of thumbnails ,by moving the slide bar at the bottom of interface , this is particularly useful if you have large amount of image files and you want to see maximum number of image files at once .
Picasa offers a number of image editing features like color enhancement , red eye reduction , cropping images to particular size etc . Now when you select a image you get a screen similar to this offering a variety of image enhancement features which you could use to improve quality of image .
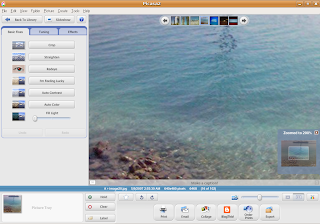 After selecting a image you can easily zoom into or out of image using slide bar at bottom of interface
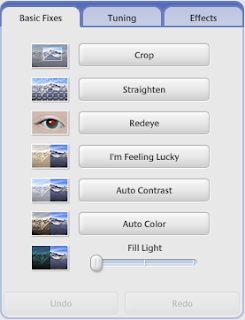
Basic Fixes has the following enhancements : -
 Tuning provides the following options : -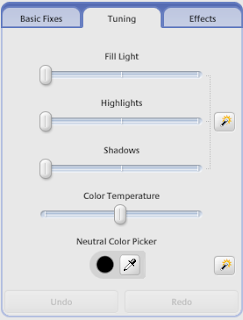
Effects provide a number of different effects to modify the features of photo : -
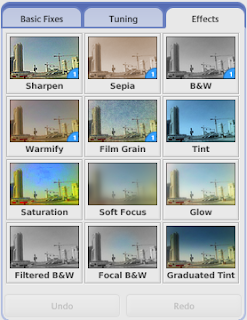
Now large number of image editing features are available in Picasa and there shouldnt be any need for any external image editing program .
At the bottom of interface you would find buttons allowing you to easily Print , Blog ,Email ,Collage Photos there are number of other features which are not being documented here .
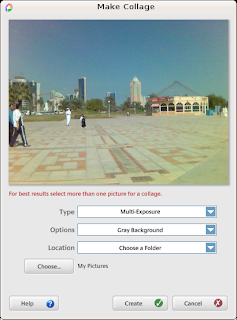 Picasa Make Collage Feature
Now i tried Blogthis button but to my dismay this feature didnt seem to work. However Print and Email photos did work well. I was pleasantly surprised to note that Picasa offered to Email photos using Gmail account apart from allowing using POP3 accounts and some Picasa Mail(Couldnt check it out) ,this can be really helpful for someone without a POP3 account(most of us) .
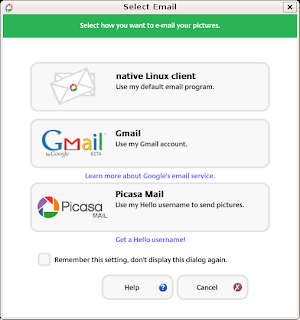 Picasa Email Feature
Besides all the image editing features , you can also view images in the library as slide show or screen saver .
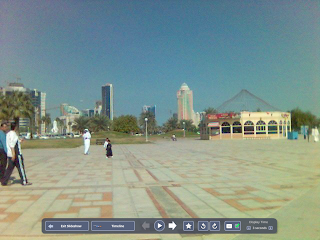 A Slide-Show Session in Progress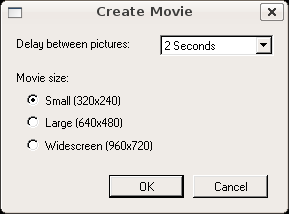
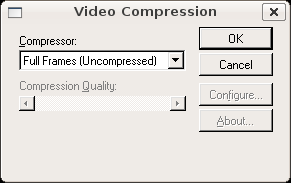
After pressing ok button you will find another dialog box similar to this asking for some other details on pressing "OK" movie of the images selected would be created. As mentioned before the movie created is in AVI Format .
Another great feature i really liked in Picasa was Export as Web Page feature , on selecting a group of images from the library and selecting Folder -> Export as Webpage or Pressing (Ctrl + W) you will get a couple of dialog boxes asking for how web page should look after completing these steps you would find all the images shown in the default web browser as web page which then could be uploaded .
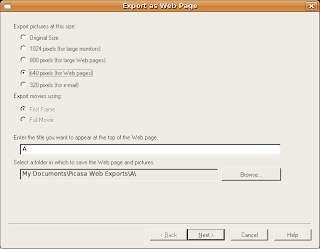 Dialog box asking for image size in web page
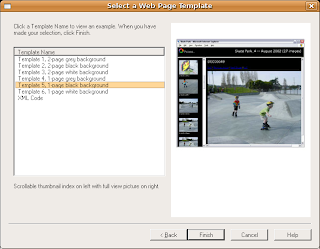 Dialog box asking which template to use for web page(How web page should look)
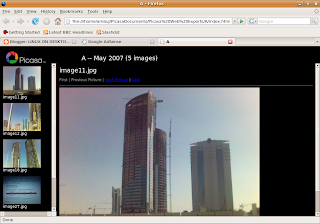 Finally this is how web page of selected images looks
 Overall Picasa is an extremely professional application for Photo Management that provides a host of impressive features ,it is availability of quality applications like picasa that encourages people to use Linux on desktop . However picasa is still a Windows application that runs on Linux using compatibility layer and so there are some minor issues with application stability and it would be really nice to see Google develop native version of Picasa for Linux .
(C) 2007, Ambuj Varshney
For Linux On Desktop Blog (http://linuxondesktop.blogspot.com)
Available link for download
.png)

Monday, March 27, 2017
More FUN with Photos
More FUN with Photos
Hi,
I think I "may" have posted these links previously - but just recently I came across a new site Photofunia.com that I have had "fun-ia" with! http://www.photofunia.com
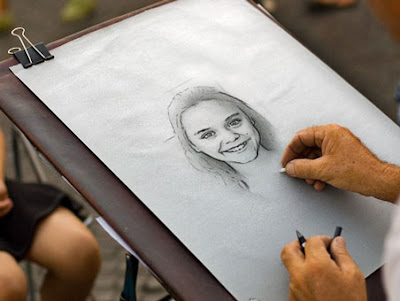
Took photo of my granddaughter and the site uses "face" recognition to render its output - thought this looked good of her - an artist rendering a "sketch"
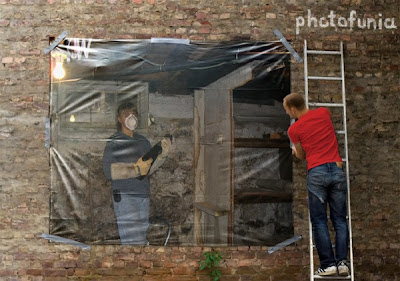
And here is one of my dd, which shows a photo of her ripping out our old fruit cellar in the basement - I love the duct tape elements
 Here is the listing and links I have to some threads over at pcCrafters messageboard with my own examples of Photo Fun
Also there are FREE Online Photo Editors - take a look at Photobucket.com and others
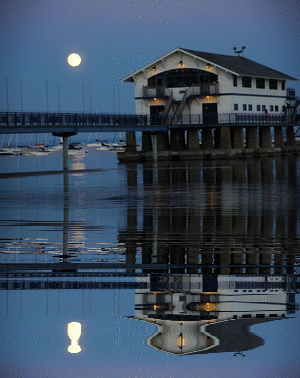
Heres one that I did a animated reflection on using the online editor Lunapic.com:
This is a photo of the boat house of the Buffalo Canoe Club located at Point Abino, Ontario Canada, of which I am a member - my dad and late husband raced their Lightning class sailboats out of this venue for many yrs.
Fun with Photos online editing and photo creating
http://bighugelabs.com/flickr/
Make your own Photo - Rubik’s cube
http://www.dumpr.net/rubik.php
Dont forget to check out the other fun things you can do with photos there as well:
Sketch - makes a b&w pencil sketch from a photo - results will vary depending on the actual photo
http://www.dumpr.net/sketch.php
Easter Egg
http://www.dumpr.net/easter-egg.php
Puzzle - just puts puzzle pieces overlay on a photo
http://www.dumpr.net/puzzle.php
Amazing Circles - kinda smooshes and swooshes your images
http://www.dumpr.net/amazing-circles.php
This one I like : Museumr
http://www.dumpr.net/museumr.php
see my own examples in this pccrafter thread
http://messageboard.pccrafter.com/fb.aspx?m=481062
Glass Giant
http://www.glassgiant.com/make_pictures.php
see my own examples in this pccrafter thread
http://messageboard.pccrafter.com/fb.aspx?m=589948
Fun with Text **note – text generators not working as of May 28, 2009 – but site owner say’s he’s working on re-writing codes – so keep checking back on this fun site
http://www.says-it.com/
More fun things to do with photos and/or text
read this thread
http://messageboard.pccrafter.com/fb.aspx?m=578159
Available link for download
Wednesday, March 15, 2017
Making Passport Photos for 4x6 Size
Making Passport Photos for 4x6 Size

???????????????? Photoshop ??? design ??????????????? ????????????????????? ????????? ?????? ???????????????????? ?????????????? ?????????? software ?????????????? ??????????
???????????????? ????????? ??????????????????????? ???????????? ?????? ???????????? ?????????? ??? ??????????? tutorial ??? photoshop ??? ??????????? ?????????????? ?????????????? ????????? ??????????????? ?????? ????????????
4 x 6 Size ????????????????? Passport ?????????????? ?????????????? ???? ?????????????????? ??? ??????? ???????????????????? ??????????????? ???????????? ??????????????? ??????????? ??????????? 4 x 6 Size Photo Paper ?????????? Alt Key ????? drag ????????? layer merge ????????? ???? layer ??????? ????????? Alt Key ???????? drag copy ??????????? ????????????????? ???????? ??????????????????????? ?????????? ?????????? ?????????? ???????? ??????? creative ??????? ?????????? ?????????? ???????? ?????????????? :)
Download Now
File type= PDF and Size=641.35 KB
Available link for download
Tuesday, October 11, 2016
Make vector portraits from photos
Make vector portraits from photos

He shows you how to trace the basic shapes using the main tools in Illustrator, and how to use layers to organise the photos and your new vector artwork. You will discover how to create the feeling of light and shadow, build a simple brush to work with and use the Pen tool for more geometrical shapes.
You’ll also discover the possibilities of the Pathfinder tool, and how to draw with the brush to create a looser feel. We’ll also show you how to play around with elements of the portrait to build up the background and how to use a simple raster to give it some texture.


In Photoshop, open photo.jpg from the Download Zone and select Duplicate Layer from the menu in the Layers panel. Use Cmd/Ctrl + L to bring up the Levels dialog, then use the middle slider to make the new layer a bit lighter, so the subject stands out better from the background.

Use the Polygonal Lasso tool (L) to separate the subject from the background in the duplicated layer. This can be done quite roughly. Once the subject is selected, go back to the original layer, invert your selection (Cmd/Ctrl + Shift + I) and delete the background. Now you can delete the duplicated layer.

Now choose the Crop tool (C) and select just the subject’s face and a bit of her chest. Set the Crop Guide Overlay to None in the Options bar to help you see what you’re doing. For now, we’ll keep the image’s resolution unchanged.

Duplicate the layer, name it ‘Contrast’, then increase the contrast on this layer. Duplicate this layer and select Image > Adjustments > Posterize with a Level of 4. Now rename this layer ‘Posterize’.

Now change the image resolution to 150dpi and the height to a maximum of 25cm; this will make the subsequent Illustrator file smaller. Save it as a PSD.

Open the PSD file in Illustrator and use the ‘Convert Photoshop layers to objects’ option. Now all your layers are in Illustrator’s Layers panel.

Set the document up as a portrait A4 page, then save it as an Illustrator document. You can save it as a PDF instead to reduce the file size and stop your hard disk from overflowing.

Make a new layer and call it ‘Front’. This is the layer we are going to work in. Put this layer on top of your other layers. Lock the other layers.

In the Brushes panel, select New Brush. Select New Calligraphic Brush and click OK. Rename it Basic Brush and set the Diameter to 1 and the angle to 0°. Choose Cmd/Ctrl + B to activate the brush, using black for the stroke colour and no fill.

Now it’s time to start tracing the photo. In general, use the brush for irregular shapes and the Pen tool for more geometrical shapes. Start off by mapping out the basic shapes. It will look a bit messy once you’re finished, but trust me, that’s fine for now. I start off by tracing from the ‘Posterize’ layer and turn to the other layers later if I want to add more detail.

Make sure the shapes are joined (using Cmd/Ctrl + J). Now you can start filling them, using the Eyedropper tool to pick colours from the ‘Posterize’ layer (you may also want to store them in the Swatches panel). If some shapes overlap, copy and select the shapes that need to be divided, then go to the Pathfinder panel (Cmd/Ctrl + Shift + F9) and hit the Divide button. Ungroup them (Cmd/Ctrl + Shift + G) and delete the parts you don’t need. Remember to Group them again afterwards (Cmd/Ctrl + G).

Now return to the ‘Contrast’ layer (and the ‘Levels’ layer too, if you created this) – to pick out more details. After this, try playing around with the colours. Using gradients makes the results subtler and gives a pleasing painterly effect.

Create a new layer called ‘Background’ and draw a rectangle the size of the document; I’ve made mine dark blue to make the face stand out more. Also draw some simple liquid shapes with the Basic Brush to make the composition more dynamic.
Open the raster.eps file and place the object over the green cap. Select both cap and raster element, duplicate them and drag the result beyond the document edge. Bring it to the front (Cmd/Ctrl + Shift + }) with the raster over the cap. Hit the Crop button in the Pathfinder panel. Align the result over the first raster element (use Smart Guides to help you), then delete the first element. Now you have a rasterised fill giving the cap more texture.

To assess your work, create a new layer called ‘Mask’ to use as a sort of picture frame. With the Rectangle tool, drag a selection over the artboard. Drag another rectangle bigger than your artboard. Select both and right click > Compound Path. Make this white and lock the layer.
Select Object > Path > Offset Path to accentuate the sunglasses – a value of 1mm should do. Choose Preview to see what works. To add an extra line inside, create another with an offset of -1mm. Note that it’s not an outline, but an extra shape. Do the same for the scarf.

I want to add more detail to the scarf, which should make the rest more abstract. First, reduce the scarf area to just blue and black by deleting some things you’ve drawn. Now use the Basic Brush to create a stripe pattern using colours from the Swatches panel, then use the Pathfinder panel’s Divide tool to fit the shape in the scarf. Next, draw a shape with your brush to suggest shadow. Open the Transparency panel (Cmd/Ctrl + Shift + F10) and select a Multiply blending mode with an opacity of 30%. Do the same for the background and clothing.

Copy the layer with the Multiply blending mode and paste it a number of times. Place them under the clothing to give it more depth.
Copy one part of the scarf pattern, group the elements (Cmd/Ctrl + G), scale them up slightly and place them in the background. Again use copy-and-paste versions of the layers with Multiply blending modes to add more depth to the composition.

Step 17
Delete the ‘Mask’ layer and the layers you brought in from Photoshop. In the Layers panel menu, select Flatten Artwork. Select all your elements (Cmd/Ctrl + A) and group them (Cmd/Ctrl + G). Drag a rectangle precisely over your artboard and make sure it is on top of your grouped artwork. Select all again (Cmd/Ctrl + A) and hit Cmd/Ctrl + 7. Now you’ve made a clipping mask of your work, showing only what is within the artboard. Your vector portrait is now complete.
Available link for download