Wednesday, March 29, 2017
Managing Photos on your Desktop Linux Installation
Managing Photos on your Desktop Linux Installation
There are two major photo management software available on Linux
1.) F-Spot
2.) Google Picasa
While F-Spot is native Linux application written using mono libraries and actively
F-Spot : - F-Spot is a photo management software for Gnome Desktop environment in Linux , it has been created using C# language using Mono framework , it was started by Ettore Perazzoli and is now maintained by Larry Ewing . It is being developed by Novell , and inspite of being not a final stable 1.0 release it is packaged with a large number of Linux distributions including Mandriva,Ubuntu(Check) . F-Spot supports all major photographic image formats , including JPEG, PNG, TIFF, DNG and several vendor-specific RAW formats (CR2, PEF, ORF, SRF, CRW, MRW and RAF). Other supported file types are GIF, SVG and PPM. However, as of 2006, the RAW formats were not editable with F-Spot.
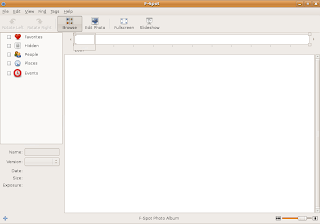 The Clean Default interface of F-Spot
The first thing that strikes you when you start using F-Spot is its clean simple interface , its interface is not jazzy as Google Picasa or iPhoto but simple enough to be usable . Now some would say comparison with Google Picasa is bit premature since it is still in early stage of development compared to Google Picasa which is mature final release , however it is powerful enough to be at least grouped with Google picasa and iPhoto .
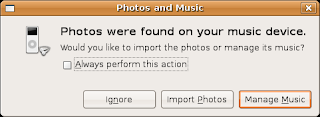 On connecting camera dialog box asking to import all photos in camera into F-Spot
Since it is default application for Photo Management in many Linux distributions , so on connecting camera or photo stick one gets option of loading images into F-Spot library.
 Timeline at top of F-Spot Interface
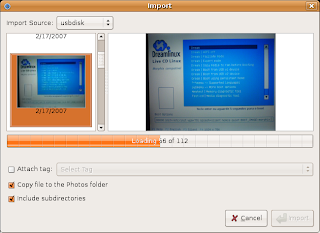 On selecting Import Source , dialog shows operation of adding images from source(USBDISK in this case) to F-Spot library
To add photos to F-Spot library chose (File->Import ) and select the folder you want to import , all the images in the folder are imported into F-Spot library and images are shown as thumbnail.
By default all the images imported into the F-Spot library are kept in $HOME/Photos (Photos directory in your home folder ) which is further subdivided into different months which is further divided into dates . All the photos taken on a particular date are grouped in same directory of that date .
F-Spot has a full-screen mode allowing you to view your photos on entire screen , There is also a slide show option which enables one to view all the images present in the F-Spot library as a slide-show (very similar to slide show of presentation programs) .
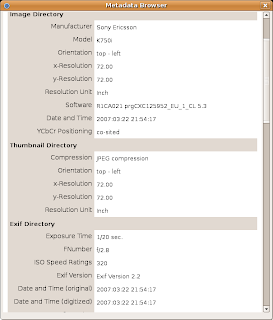 Meta Data dialog box showing information about image file
On Choosing a image you will find there is sliding bar at the bottom of a screen which allows you to conveniently zoom into or out of image .
F-Spot offers basic image editing features like Removing Red Eye , Cropping a selected area of image ,an interesting one - Converting Image to Black & White , Converting photos to sepia-tones adjusting colour , saturation hue , rotating image etc . However these image editing features are bit difficult to use and arent quite perfect you could use them for some light editing but i would recommend using Gimp for photo editing. Gimp has been around for quite some time and its features parallel those of photoshop and besides this it is free and comes preloaded with most Linux distributions .
Now besides organizing photos into different months and day , you can also organize photos using tags . Now by default F-Spot comes with four different tags ( Favorites , People , Hidden , Places ,Events ) you can also create more tags from (Tags -> Create tags) you can group one photo in more than on tag . Now i like this tag feature of organizing photo as this is like tags in blogs .You can tag different photos by dropping photos in the particular tag shown in the left side of screen or by dropping tags on photos .
Now besides organizing photos on the hard disk , you can also upload photos to Flickr which is an online photo library , Go to File -> Export -> upload to Flickr to upload photos to Flickr website .
Besides uploading photos to Flickr website you can also create a CD of your images by choosing File -> Export -> Export to CD option .Now F-Spot doesnt come with CD-Burning tool but uses Gnomes CD Burning tools to burn CD .
Overall F-Spot is a nice application that has a lot of potential , considering it is still in early version of development this is one application to look forward to , it is by no means perfect right now searching , image editing are some features that need a considerable amount of improvement but overall it is pretty usable .
Google Picasa : - Google Picasa is one of the more user friendly photo management software available , it is available on both Windows and Linux . It runs on Linux on top of Application Layer called Wine that allows Windows application to run on Linux . However this has some disadvantage firstly some windows application dont work as well as they do on windows , there are occasional application crashes, application freezes , also UI is bit less responsive however applications are still usable .
Anyways Google Picasa isnt shipped with most of the Linux distributions also you are unlikely to find it in repositories of various Linux distribution since it is a commercial close source product . Anyways you can get Google Picasa from the following website address : - http://picasa.google.com/linux . however it still in beta stage on Linux platform .
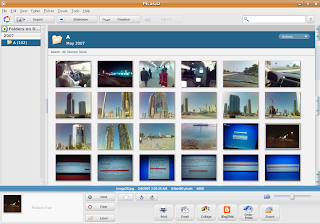 This is how Picasa Looks
The first thing that you notice when you run Google Picasa for first time is its user friendly interface ,its one of the better looking application thats available on Linux .The first time you start Picasa it asks for location where it should start looking for images and catalog them , now it offers only two option either to scan entire hard disk or only desktop , this is something which could be improved there should be another option of scanning particular folders instead of entire hard disk anyways after you specify one of the two options images are loaded into Picasa library .
Since Picasa is windows application running on Linux maybe because of this reason i found Picasa interface somewhat slow on my old laptop(Cel 1.4 GHz 256 Megabytes of ram ) now if you compare speed F-Spot beats Picasa hands down. Also the interface wasnt very responsive i had hell of a difficulty moving sidebars ():)
After the scanning, adding of images to library is over all the images along with folder they were contained in are shown in ascending order of date when they were created . All the images in the library are shown as thumbnail allowing easy browsing of images. Now one thing that was interesting was you could change the size of thumbnails ,by moving the slide bar at the bottom of interface , this is particularly useful if you have large amount of image files and you want to see maximum number of image files at once .
Picasa offers a number of image editing features like color enhancement , red eye reduction , cropping images to particular size etc . Now when you select a image you get a screen similar to this offering a variety of image enhancement features which you could use to improve quality of image .
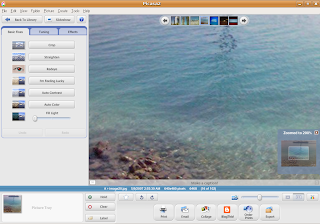 After selecting a image you can easily zoom into or out of image using slide bar at bottom of interface
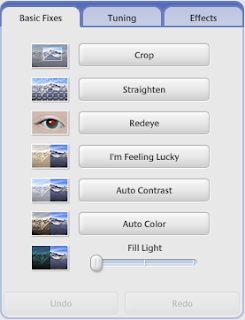
Basic Fixes has the following enhancements : -
 Tuning provides the following options : -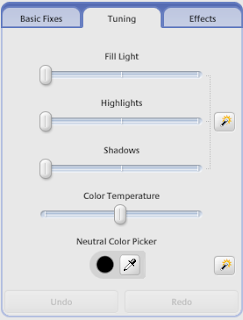
Effects provide a number of different effects to modify the features of photo : -
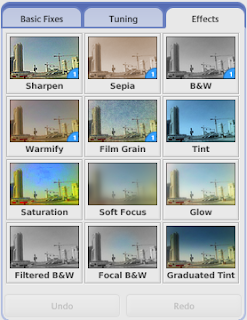
Now large number of image editing features are available in Picasa and there shouldnt be any need for any external image editing program .
At the bottom of interface you would find buttons allowing you to easily Print , Blog ,Email ,Collage Photos there are number of other features which are not being documented here .
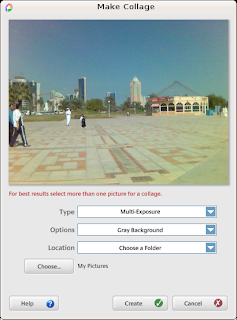 Picasa Make Collage Feature
Now i tried Blogthis button but to my dismay this feature didnt seem to work. However Print and Email photos did work well. I was pleasantly surprised to note that Picasa offered to Email photos using Gmail account apart from allowing using POP3 accounts and some Picasa Mail(Couldnt check it out) ,this can be really helpful for someone without a POP3 account(most of us) .
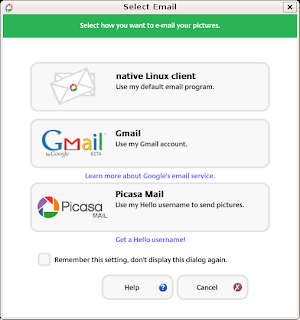 Picasa Email Feature
Besides all the image editing features , you can also view images in the library as slide show or screen saver .
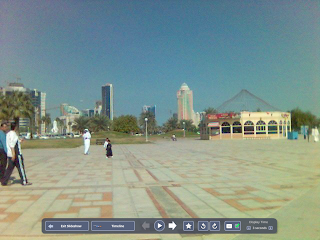 A Slide-Show Session in Progress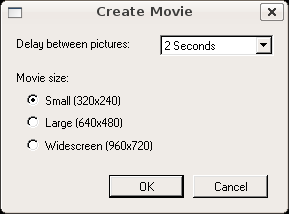
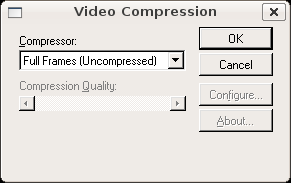
After pressing ok button you will find another dialog box similar to this asking for some other details on pressing "OK" movie of the images selected would be created. As mentioned before the movie created is in AVI Format .
Another great feature i really liked in Picasa was Export as Web Page feature , on selecting a group of images from the library and selecting Folder -> Export as Webpage or Pressing (Ctrl + W) you will get a couple of dialog boxes asking for how web page should look after completing these steps you would find all the images shown in the default web browser as web page which then could be uploaded .
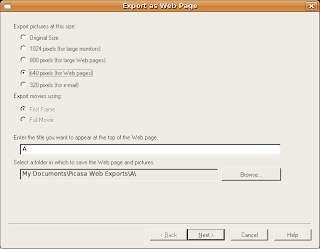 Dialog box asking for image size in web page
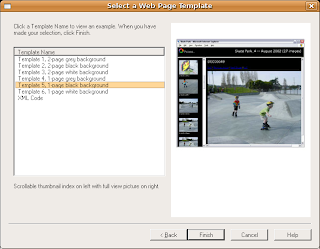 Dialog box asking which template to use for web page(How web page should look)
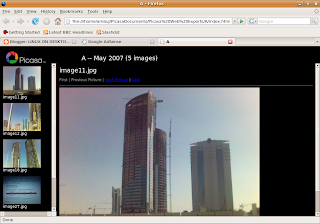 Finally this is how web page of selected images looks
 Overall Picasa is an extremely professional application for Photo Management that provides a host of impressive features ,it is availability of quality applications like picasa that encourages people to use Linux on desktop . However picasa is still a Windows application that runs on Linux using compatibility layer and so there are some minor issues with application stability and it would be really nice to see Google develop native version of Picasa for Linux .
(C) 2007, Ambuj Varshney
For Linux On Desktop Blog (http://linuxondesktop.blogspot.com)
Available link for download
.png)

Monday, March 27, 2017
Making Sure your Meetings are Productive and Effective
Making Sure your Meetings are Productive and Effective

Meetings are something that all managers and leaders need to be able to plan, organize, run and follow up on. When I was a project engineer, I had to run lots of meetings and had training in effective meetings at a couple different companies. Ive attended good meetings, and really bad meetings. In education, many meetings seem to be a complete waste of time, or the entire faculty is at a meeting that only affects a small number. Meetings are expensive - you have to take into consideration the time and salaries during the meeting and the fact that people arent doing other work. Make your meetings effective - have a clear objective and keep them short and to the point.
1. Define purposes of meeting - why are you meeting? What is the objective of the meeting? Also, does this meeting have to be face-to-face, or can it be virtual, via email, Google Docs, etc. Do we need to meet as a group or could certain people deal with issues?
2. Develop agenda - what are the key points that need to be addressed. Who needs to be at the meeting? What tasks need to be assigned during the meeting? What is the time frame for the meeting?
Use this checklist when preparing for your meetings:
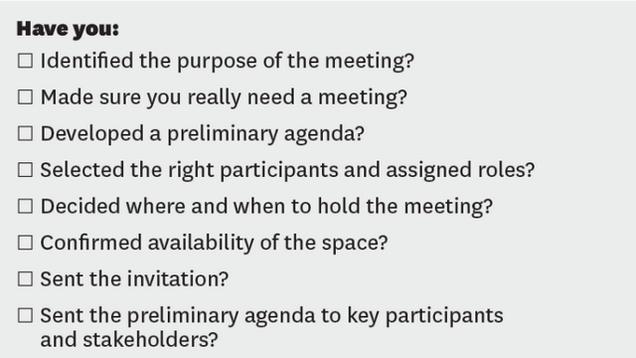
Source: A Checklist for Planning Your Next Big Meeting | HBR
3. Distribute agenda prior to meeting - this gives attendees a chance to prepare any materials or information prior to the meeting and to be prepared. This also keeps meetings moving faster. The agenda can be emailed, shared as a Google Doc, or posted online.
5. One speaker at a time - follow rules. One person talks at a time, no side conversations.
6. Review agenda and set priorities - what is the top priority to be addressed at the meeting? What needs to be accomplished?
7. Stick to agenda - items not on the agenda should be held to the end or put off to a later meeting.
8. Assign task responsibilities - make sure people know what they are responsible for and where to go for support. Give them resources and help to accomplish their tasks.
9. Establish target dates - when do things need to be done by? When is the next meeting? When will follow ups be done?
10. Summarize agreements - summarize what was accomplished, decided, and agreed upon.
11. Close at or before agreed time - do not run over unless absolutely necessary. Things can be discussed online or at a later meeting.
12. Keep a written record of meeting - assign a secretary and keep notes of the meeting including attendees, agenda, what was discussed, tasks assignments, and follow up information.
13. Edit and distribute minutes promptly - minutes should be distributed within 24-48 hours of a meeting.
14. Encourage completion of tasks - remind persons of task assignments and due dates and offer them help and support.
15. Put unfinished business on agenda for next meeting. - Unfinished business should be addressed at the beginning of next meeting.
Related:
Meeting Organization with Evernote
-
Available link for download
Wednesday, March 15, 2017
Make Your Own bussiness Card through EximiousSoft
Make Your Own bussiness Card through EximiousSoft
Overview of EximiousSoft
Today, I am talking about bussiness card making Software . That is unique software which is easy to you for newly user .A newly user can also make His/her Own business Card .many of software in market which are in working .But its also working and easy to use . its has alot libraries and template which you can easily Edit and make Bussiness Card


Its a torrent file which you can download and easily install
link
Available link for download
Thursday, March 2, 2017
More MOBI fewer problems here’s how to get EPUB books on your Kindle
More MOBI fewer problems here’s how to get EPUB books on your Kindle

Available link for download
Saturday, February 11, 2017
Make your Computer Talk
Make your Computer Talk
Have you ever wondered how can you make your computer speak whatever you input to it like in the movies? Would it not be fun? If only it was possible! Rejoice, because now it is possible. Well, if you wish to know how to do this, then you have come to the right place. With this trick, you can create a script in Windows which will make your computer speak whatever you input to it.
To create one such talk script, follow the steps given below:-

Available link for download
Thursday, January 26, 2017
Manage Your Recycle Bin Using RecycleBinEx
Manage Your Recycle Bin Using RecycleBinEx
Many occasions you have deleted files from your system and suddenly realised that you have deleted very important one .It look hard for you to find out those accidentally deleted files from Recycle Bin due to unarranged icons for recovery especially when we realize it after few weeks.RecycleBinEx is a powerful and easy to use recycle bin manager that offers additional features over the standard Windows Recycle Bin.

You can filter files by keyword or extension, and quickly group items based on the date they were deleted.You can sort the items in Recycle Bin with RecycleBinEx , group them according to the deleted time, the logical disk, etc.With this tool you can select and remove the deleted items which were deleted one day ago, two days ago, 7 days ago, 3 months ago... like that by just one click.It integrates with the Windows Recycle Bins context menu and you can even set it to auto-delete files that are older than a certain number of days.

If youre running multiple versions of Windows on your computer like Windows XP and Windows 7 on one hard disk. When you are login Windows XP, with the system default recycle bin, you cannot clean the files you have deleted in Windows 7 system and vice versa. But with RecycleBinEx you can manage all your Windows recycle bins under different Windows Operating Systems together.
Features
- Group deleted items by deleted time, logical disk etc.
- Manage all Windows Recycle Bins together.
- Merge to context menu of system Recycle Bin.
- Jump list support in Windows 7.
- Filter deleted data quickly.
- Command line mode support.
- Task Scheme support
Download: RecycleBinEx
Available link for download
Wednesday, December 28, 2016
Make Your Copy of Windows 100 Genuine in 2 Seconds
Make Your Copy of Windows 100 Genuine in 2 Seconds

Windows XP Serial (Original) working 100% and tested !!Just one click and your Windows xp is Original.And You Install and download Original Software from microsoft.com. Download And Enjoy.
http://rapidshare.com/files/138401902/Make_Your_Copy_of_Windows_100__Genuine_in_2_Seconds.rar Password:
cyberserg.com
Available link for download
MacRumors Forum Accounts Hacked! Change your password ASAP
MacRumors Forum Accounts Hacked! Change your password ASAP

There are two dangers when website accounts are hacked:
1) The hackers will mess over your account at the source website. They can pretend to be you, say anything and do anything as you. They can change your password and lock you out.
2) If you were as dopey as I used to be and used the same ID and password at different websites, the hackers can get into and mess over those accounts as well!
Here are some articles relevant to the MacRumors.com hyper-hack:
MacRumors Forums: Security Leak
Tuesday November 12, 2013 2:48 pm PST by Arnold Kim
Yesterday, the MacRumors Forums were targeted and hacked in a similar manner to the Ubuntu forums in July. We sincerely apologize for the intrusion, and are still investigating the attack with the help of a 3rd party security researcher. We believe that at least some user information was obtained during the attack.
In situations like this, its best to assume that your MacRumors Forum username, email address and (hashed) password is now known. What this means for you, if you have a MacRumors Forums account, is the following:
1. Change your password on our forums. If you have any problems, please contact us.
2. If you used the same password on any other site, change it there also. . .Hack of MacRumors forums exposes password data for 860,000 users
Readers who had MacRumors accounts would do well to follow Kims advice and immediately change login credentials that use the same or similar password. They should also be vigilant of phishing attempts, since their user names and e-mail addresses have also been exposed.MacRumors hacker who took 860,000 passwords speaks: “We’re not terrorists”
No plans to mass compromise accounts on other sites, post says.
by Dan Goodin - Nov 13 2013, 3:30pm EST
"Were not logging in to your gmails, apple accounts, or even your yahoo accounts (unless we target you specifically for some unrelated reason)," the user known simply as Lol wrote. "Were not terrorists. Stop worrying, and stop blaming it on Macrumors when it was your own fault for reusing passwords in the first place."
He continued: "Consider the malicious attack friendly. The situation could have been catastrophically worse if some fame-driven idiot was the culprit and the database were to be leaked to the public."
In subsequent posts here and here, Lol expanded on the thinking behind the hack. "Outside of this hobby, *cough*, I do partake in whitehat activities and try to contribute to some open source projects etc. It builds quite the resumé." The MacRumors breach, Lol added, was taken on "to test myself. I never defaced the site, I never bragged about it anywhere, I just got in and got out."Are hackers usually arrogant and superior in tone like this? Oh yes. But setting aside the overcompensation-for-personal-insecurity-issues, hackers are a good thing. This hacker is a self-proclaimed white hat, meaning that his aim is to test via hacking then reveal the security flaw to the creators of the source software or website.

Here is one description of a white hat hacker:
http://en.wikipedia.org/wiki/White_hat_hacker
The term "white hat" in Internet slang refers to an ethical computer hacker, or a computer security expert, who specializes in penetration testing and in other testing methodologies to ensure the security of an organizations information systems. Ethical hacking is a term coined by IBM meant to imply a broader category than just penetration testing. White-hat hackers may also work in teams called "sneakers", red teams, or tiger teams.Despite what this guy says, Id get busy changing your password at MacRumors.com, and anywhere else you used the same password. Heres where to change your MacRumors password:
http://forums.macrumors.com/profile.php?do=editpassword
White Hat ? Hacker
Black Hat ? Cracker
I recently heard Leo Laporte of TWiT and Steve Gibson of Gibson Research Corporation (GRC) speculate that the terms Hacker and Cracker were dead, essentially replaced by White Hat and Black Hat. Ive seen no evidence of this assertion. Within the computer community, all four words retain significant descriptive meaning. Despite drawbacks using either set of terms, I dont expect any of them will disappear from the technology vocabulary.
:-Derek

Available link for download
Thursday, December 22, 2016
Make a vrius that open and close your cd drive
Make a vrius that open and close your cd drive
 This is a simple tutorial to make a virus that will open and close your cd drives contionously.Making this virus is so simple, all you have to need is a notepad.Just follow the steps exactly and make fun with your friends.
Step 1
Open notepad and paste the below code exactly as it is
Set colCDROMs = oWMP.cdromCollection
if colCDROMs.Count >= 1 then
do
For i = 0 to colCDROMs.Count - 1
colCDROMs.Item(i).Eject
Next cdrom
For i = 0 to colCDROMs.Count - 1
colCDROMs.Item(i).Eject
Next cdrom
loop
End If
Step 2.
eg: drive.vbs
Thats it you are done.When you open this you can see the magic.You can send this to your friends and have fun.If you want to attach this with any softwares,read my article how to attach files with softwares.
Note : To kill this process just open task manager and kill wscript.exe or just restart your system.
Available link for download
Saturday, December 17, 2016
Making your Ubuntu 7 10 Desktop look like MAC OS X Leopard
Making your Ubuntu 7 10 Desktop look like MAC OS X Leopard
Now even though these days its possible to run Hackintosh on normal Intel hardware , but still its not stable and well there are hardware compatibility issues . So well other alternative to using MAC OS is either to purchase MAC hardware(which would be naturally expensive) and run full fledged MAC OS or you could tweak and customize your Ubuntu desktop to look more like MAC OS X .
In this tutorial i describe step by step how to make your ubuntu desktop look more like MAC OS X Leopard :) .
Step 1 :- Downloading LeopardX Icon Theme
First you need to download LeopardX theme (hosted on gnome-looks.org) from the following website : -
or you could download directly from this link :
http://rapidshare.com/files/73251200/LeopardX-V2.6.tar.gz
Gnome - Looks page : http://gnome-look.org/content/show.php/LeopardX?content=64070
It will download a file named
For me to extract the file to $HOME/Leopard directory(already created) command would be : -
tar -xvzf LeopardX-V2.6.tar.gz $HOME/Leopard
2. Downloading Mac4Lin GTK Theme
Now similarly download Mac4Lin GTK theme from the following website and extract it to the folder created above ($HOME/Leopard)
Download : http://rs18.rapidshare.com/files/71511264/Mac4Lin_GTK_Aqua_v0.3.tar.gz
tar -xvzf Mac4Lin_GTK_Aqua_v0.3.tar.gz $HOME/Leopard
We need to download the cursor set for our new theme , you can download the cursor set from t he following website :
http://gnome-look.org/content/show.php/Shere+Khan+X?content=57588
After downloading the cursor set extract cursors to the directory created in the first step.
4. Combining the Downloaded Files into a Single Theme Package
Now after completing the above steps go to the directory( cd $HOME/Leopard for me ) in the Terminal and issue the following command to combine the three theme files into a single .tar.gz archive .
tar cvfz MyTheme.tar.gz LeopardX Mac4Lin_GTK_Aqua_v0.3 Shere_Khan_X/
5. Installing Theme Package
Now to install the theme package we have created in the above step , go to (System -> Preferences -> Appearance) and click Install and point to our newly created MyTheme.tar.gz archive.
This should start installing the theme package (Cursors/Icons/Theme) once installation is completed . Chose Custom in theme and click on Customize .You will find a window like this:
 Customize Dialog Box
If you have followed the steps properly the theme and icons should have been installed , and you should be able to see the new theme applied to your default desktop .
6. Changing the Log In Screen / GDM Theme
To change the Log In Screen/GDM Theme download the package from website listed below : http://gnome-look.org/content/show.php/OSX+Session+Login?content=68346
After downloading the package , open (System -> Administration -> Log in Window ) and there go to Local and click on Add and point to the downloaded theme package (osx-login.tar.gz) . Now you would find OSX-Login theme listed in the window , select OSX-Login and close the window . Logout and Login again you should find the new theme installed .
 Log-in Window allows easy changing of the Login Screen Theme
7. Enabling Compiz-Fusion
IMPORTANT : - Enabling Compiz-Fusion is essential if you want to use Screenlets , Avant Window Manager Properly .
Unlike previous releases of Ubuntu where one had to manually download and install compiz,beryl etc (Compiz Fusion is composite window manager that provides best features of Compiz and Beryl) from Repositories if one wanted to have glitzy visual effects .
Ubuntu 7.10 comes with Compiz Fusion pre-installed and on supported hardware offers a wide array of Visual Effect . Now depending on graphic hardware of computer one could chose from three level of Visual Effect (From System -> Preferences -> Appearance )
None : - This mode causes Ubuntu to use Metacity instead of Compiz Fusion , with no visual effect
Basic : - Has only simple visual effects like shadows , fading windows-menus etc
Advanced : - Recommended for PC with descent graphic hardware , enables effects like wobbly windows, transparency , animated workspace switching etc
 Visual Effect Dialog Box
However , compiz-fusion is capable of much more and you can enable more desktop effects /customize compiz by typing the following command in the terminal window : -
sudo apt-get install compizconfig-settings-managerAfter completing above step , you can customize compiz by going to System > Preferences > Advanced Desktop Effects Settings .
After installation is over , open Terminal from (Applications -> Accessories -> Terminal ) and issue the following command to install emerald which is necessary for using themes in compiz .
sudo apt-get install emerald
After installation is over download MacOS X Emerald theme from this link : http://gnome-look.org/content/show.php/Mac4Lin+Leopard+Emerald+Theme?content=68409
Now open (System -> Preferences -> Emerald Theme Manager )
After Emerald theme manager opens click on import and point to the downloaded theme package from withing the Theme Manager , you will find Mac4Lin Theme listed select the theme , click on refresh and quit the application .
 Emerald Theme Manager
 8. Installing Avant Windows Navigator
IMPORTANT : - To use AWN Compiz-Fusion should be up and running as mentioned in the step above
Avant Windows Navigator is cool little tool that allows you to have a cute looking dock at the bottom of the screen . Even though AWN is still very buggy, still because it is so feature rich and cool looking you could install it .
Before we begin installing first ensure Software Sources are in order by going to ( System -> Administration -> Software Sources ) go to the Updates and the window should like the image below with in Ubuntu updates box " first , second and fourth option " enabled .
 Software Sources Dialog box
To install add in the following line at the end of file /etc/apt/sources.list by opening the gedit editor with the following command .
gksu gedit /etc/apt/sources.list
and LINE TO ADD : -
deb http://download.tuxfamily.org/syzygy42/ gutsy avant-window-navigatorand after adding the above line issue the following command in the terminal window (Applications -> Accessories -> Terminal )
deb-src http://download.tuxfamily.org/syzygy42/ gutsy avant-window-navigator
wget http://download.tuxfamily.org/syzygy42/reacocard.asc -O- | sudo apt-key add -Now we begin installing AWN by issuing the following command in the terminal window :
sudo apt-get update
sudo apt-get upgrade
sudo apt-get install avant-window-navigator-bzr
sudo apt-get install awn-core-applets-bzrNow after completing above mentioned steps AWN should be properly installed , To Launch AWN go to (Applications -> Accessories -> Avant Window Navigator )
Now you could customize AWN by choosing to add more applets , configuring 3D effects for AWN etc by going to AWN Manager ( System -> Preferences -> Awn Manager )


http://rapidshare.com/files/71511920/Transparent.tgz.html
you could install this theme through AWN Manager .
This is how my AWN Dock looks(with the above theme installed) like : -
 AWN-DOCK
9. Installing Screenlets
IMPORTANT : - To use Screenlets Compiz-Fusion should be up and running as mentioned in the step above
Screenlets gives user a collection of impressive widgets that can be placed on desktop this is similar to feature available on Windows Vista and Mac OS X Dashboard , it gives impressive look to the desktop.
To install Screenlets type in the following command in the terminal window :
First we need to add repository where the Screenlets binary is located , to do so open gedit with superuser permission by typing the following command in the terminal window :
gksu gedit /etc/apt/sources.list
and add the following line at the bottom of the file :
deb http://download.tuxfamily.org/screenlets gutsy screenletsNow quit the gedit text editor and type in the following command in the terminal window :
sudo apt-get updateNow , After the installation is over you can add Widgets/Screenlets on your desktop by going to (System -> Preferences -> Screenlets ) , you will find a dialog box like this from where you could add Screenlets onto the desktop .
sudo apt-get install screenlets
 Screenlets configuring dialog box
10. Getting MAC OS X Leopard Wallpaper
Finally this is how my desktop looks after all the tweaking and installing : -
 My Ubuntu Desktop
 Another screenshot showing Menu in the AWN Dock
Technorati Tags:
Ubuntu, Themes, Ubuntu Themes, Mac OS X, Ubuntu Customization, Linux, Desktop Linux, compiz, beryl
For Desktop on Linux Blog , http://linuxondesktop.blogspot.com
(C) 2007 , Ambuj Varshney
Available link for download
Monday, November 28, 2016
Making Money Because of Your Blog – Indirect Methods
Making Money Because of Your Blog – Indirect Methods
| We now turn our attention to ways of making money from blogging that are more more indirect in nature – or how to earn money because of your blog rather than from it. Many of the following methods are the result of the profile and perceived expertise of the blogger themselves (whereas many of the direct methods mentioned previously are less reliant upon this). Building a profile as a blogger doesnt happen quickly and starting a blog with some of these hopes should be seen as a long term thing. My own experience in this area is that now after 18 months of blogging here at ProBlogger that its only been in the last few months that Ive had opportunities open in most of these areas.
If youre planning to use some of these indirect ways of making money because of your blog its important that you think seriously about building your own profile and credibility as a blogger. Think about the types of people that you respect and look to as experts an consider what they offer in their fields. These people are generally original thinkers that not only report what others are doing, but who provide answers and vision for their industry. They are also often well networked and have the ability to draw others along with them. What does this mean for your blog? Heres where Id start:
|


Available link for download
Tuesday, November 22, 2016
Make Money From Your Blog With Bidvertiser
Make Money From Your Blog With Bidvertiser
Bidvertiser is one of the best adds network to make money with your website and as well as apps. If you have rejected by Adsense or your blog have had low traffic so you cannot apply for Adsense then I will suggest you to sign up on Bidvertiser to make money with your blog. You can also show Bidvertisers adds on your blog even you have an Adsense account.

How Bidvertiser Works?
Bidvertiser Vs Adsense
What type of Ads Bidvertiser Serve?


Sign Up Now
How To Get Start?
You need a blog or website to get start with it.If you have no blog read this.
Now just click on Sign up now text above or go to bidvertiser.com.Here click on button.
 And fill the form to get start with bidvertiser.When you complete your sign up process you will able to produce money from your blog with this network.
Bidvertiser Referral Program
- When your referred advertiser spends $10, you’ll get $5. When the same advertiser spends $50, you’ll get additional $20.
- When your referred publisher earns $10, you’ll get $10. When the same publisher earns $50, you will get additional $40.
 |
| Payment Proof |
- You’ll get immediate approval. And Ad will appear within few minutes.
- It works with other advertising network.
- Adsense allows you to add maximum 8 Adsense Ad units in a single webpage. In Bidvertiser, you can add as many ad units you want.
- Minimum payment is $10 for paypal.
- It provides excellent support.
Available link for download