Showing posts with label desktop. Show all posts
Showing posts with label desktop. Show all posts
Wednesday, March 29, 2017
Managing Photos on your Desktop Linux Installation
Managing Photos on your Desktop Linux Installation
Managing Photos on your Desktop Linux Installation
Over last few years there has been tremendous growth in Digital Photography , Digital Cameras are getting more affordable and powerful . Now with old film based cameras there wasnt a major problem in managing photos , get the negatives developed and stick your photos in the album . However this was limited you could not modify the photos( Assuming modifying dosent mean cutting and scribbling) and you were totally dependent on the Lab technician for quality of photo he developed. But all this has changed with advent of digital photography , today not only cameras are sophisticated allowing you to take perfect picture but there are software allowing you to manage and catalogue photos you take thus helping you manage your photos efficiently .
There are two major photo management software available on Linux
1.) F-Spot
2.) Google Picasa
While F-Spot is native Linux application written using mono libraries and activelysupported by Novell, Google picasa is windows based application that run flawlessly on Linux using wine application layer .Here is low down of the two applications and how they compare with each other in features .
F-Spot : - F-Spot is a photo management software for Gnome Desktop environment in Linux , it has been created using C# language using Mono framework , it was started by Ettore Perazzoli and is now maintained by Larry Ewing . It is being developed by Novell , and inspite of being not a final stable 1.0 release it is packaged with a large number of Linux distributions including Mandriva,Ubuntu(Check) . F-Spot supports all major photographic image formats , including JPEG, PNG, TIFF, DNG and several vendor-specific RAW formats (CR2, PEF, ORF, SRF, CRW, MRW and RAF). Other supported file types are GIF, SVG and PPM. However, as of 2006, the RAW formats were not editable with F-Spot.
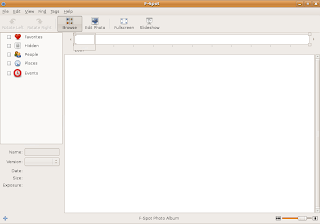 The Clean Default interface of F-Spot
The first thing that strikes you when you start using F-Spot is its clean simple interface , its interface is not jazzy as Google Picasa or iPhoto but simple enough to be usable . Now some would say comparison with Google Picasa is bit premature since it is still in early stage of development compared to Google Picasa which is mature final release , however it is powerful enough to be at least grouped with Google picasa and iPhoto .
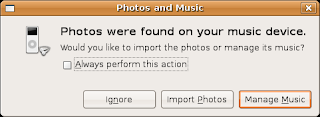 On connecting camera dialog box asking to import all photos in camera into F-Spot
Since it is default application for Photo Management in many Linux distributions , so on connecting camera or photo stick one gets option of loading images into F-Spot library.
 Timeline at top of F-Spot Interface
You Will notice there is a time-line at the top of interface ,somewhat similar to time-line you find in animation programs like flash which enables you to navigate through different frames . This is a innovative feature which really impressed me it shows total number of images in different months the greater the height of bar greater is the number of images in that month . The time-line can also be used to navigate through images of different months .
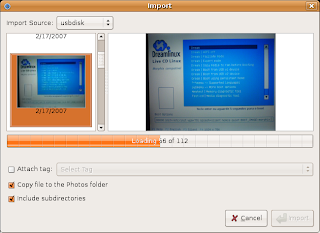 On selecting Import Source , dialog shows operation of adding images from source(USBDISK in this case) to F-Spot library
To add photos to F-Spot library chose (File->Import ) and select the folder you want to import , all the images in the folder are imported into F-Spot library and images are shown as thumbnail.
By default all the images imported into the F-Spot library are kept in $HOME/Photos (Photos directory in your home folder ) which is further subdivided into different months which is further divided into dates . All the photos taken on a particular date are grouped in same directory of that date .
F-Spot has a full-screen mode allowing you to view your photos on entire screen , There is also a slide show option which enables one to view all the images present in the F-Spot library as a slide-show (very similar to slide show of presentation programs) .
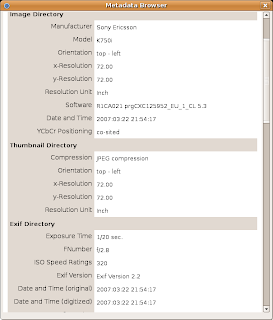 Meta Data dialog box showing information about image file
On choosing (View -> Meta Data Browser ) all kind of possible information about the image is shown . This can be particularly useful to some one into photography.
On Choosing a image you will find there is sliding bar at the bottom of a screen which allows you to conveniently zoom into or out of image .
F-Spot offers basic image editing features like Removing Red Eye , Cropping a selected area of image ,an interesting one - Converting Image to Black & White , Converting photos to sepia-tones adjusting colour , saturation hue , rotating image etc . However these image editing features are bit difficult to use and arent quite perfect you could use them for some light editing but i would recommend using Gimp for photo editing. Gimp has been around for quite some time and its features parallel those of photoshop and besides this it is free and comes preloaded with most Linux distributions .
Now besides organizing photos into different months and day , you can also organize photos using tags . Now by default F-Spot comes with four different tags ( Favorites , People , Hidden , Places ,Events ) you can also create more tags from (Tags -> Create tags) you can group one photo in more than on tag . Now i like this tag feature of organizing photo as this is like tags in blogs .You can tag different photos by dropping photos in the particular tag shown in the left side of screen or by dropping tags on photos .
Now besides organizing photos on the hard disk , you can also upload photos to Flickr which is an online photo library , Go to File -> Export -> upload to Flickr to upload photos to Flickr website .
Besides uploading photos to Flickr website you can also create a CD of your images by choosing File -> Export -> Export to CD option .Now F-Spot doesnt come with CD-Burning tool but uses Gnomes CD Burning tools to burn CD .
Overall F-Spot is a nice application that has a lot of potential , considering it is still in early version of development this is one application to look forward to , it is by no means perfect right now searching , image editing are some features that need a considerable amount of improvement but overall it is pretty usable .
Google Picasa : - Google Picasa is one of the more user friendly photo management software available , it is available on both Windows and Linux . It runs on Linux on top of Application Layer called Wine that allows Windows application to run on Linux . However this has some disadvantage firstly some windows application dont work as well as they do on windows , there are occasional application crashes, application freezes , also UI is bit less responsive however applications are still usable .
Anyways Google Picasa isnt shipped with most of the Linux distributions also you are unlikely to find it in repositories of various Linux distribution since it is a commercial close source product . Anyways you can get Google Picasa from the following website address : - http://picasa.google.com/linux . however it still in beta stage on Linux platform .
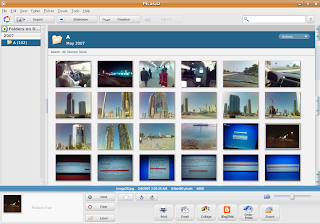 This is how Picasa Looks
The first thing that you notice when you run Google Picasa for first time is its user friendly interface ,its one of the better looking application thats available on Linux .The first time you start Picasa it asks for location where it should start looking for images and catalog them , now it offers only two option either to scan entire hard disk or only desktop , this is something which could be improved there should be another option of scanning particular folders instead of entire hard disk anyways after you specify one of the two options images are loaded into Picasa library .
Since Picasa is windows application running on Linux maybe because of this reason i found Picasa interface somewhat slow on my old laptop(Cel 1.4 GHz 256 Megabytes of ram ) now if you compare speed F-Spot beats Picasa hands down. Also the interface wasnt very responsive i had hell of a difficulty moving sidebars ():)
After the scanning, adding of images to library is over all the images along with folder they were contained in are shown in ascending order of date when they were created . All the images in the library are shown as thumbnail allowing easy browsing of images. Now one thing that was interesting was you could change the size of thumbnails ,by moving the slide bar at the bottom of interface , this is particularly useful if you have large amount of image files and you want to see maximum number of image files at once .
Picasa offers a number of image editing features like color enhancement , red eye reduction , cropping images to particular size etc . Now when you select a image you get a screen similar to this offering a variety of image enhancement features which you could use to improve quality of image .
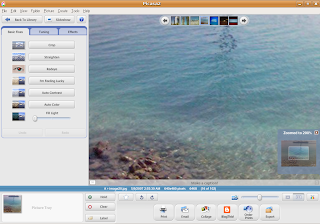 After selecting a image you can easily zoom into or out of image using slide bar at bottom of interface
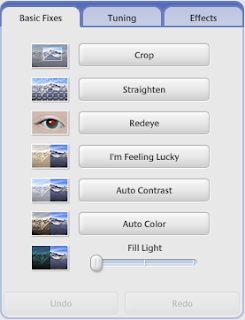
Basic Fixes has the following enhancements : -
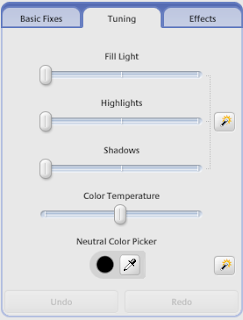
 Tuning provides the following options : -
Effects provide a number of different effects to modify the features of photo : -
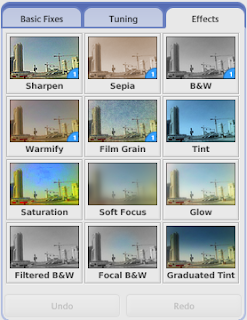
Now large number of image editing features are available in Picasa and there shouldnt be any need for any external image editing program .
At the bottom of interface you would find buttons allowing you to easily Print , Blog ,Email ,Collage Photos there are number of other features which are not being documented here .
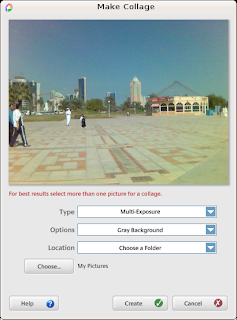 Picasa Make Collage Feature
Now i tried Blogthis button but to my dismay this feature didnt seem to work. However Print and Email photos did work well. I was pleasantly surprised to note that Picasa offered to Email photos using Gmail account apart from allowing using POP3 accounts and some Picasa Mail(Couldnt check it out) ,this can be really helpful for someone without a POP3 account(most of us) .
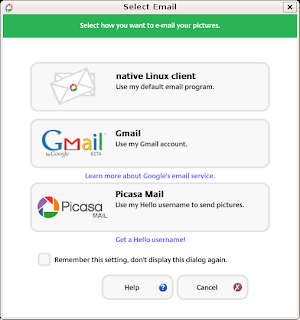 Picasa Email Feature
Besides all the image editing features , you can also view images in the library as slide show or screen saver .
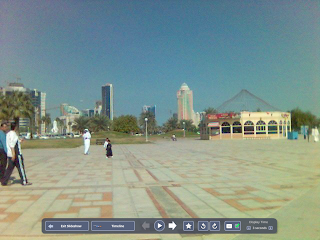 A Slide-Show Session in Progress
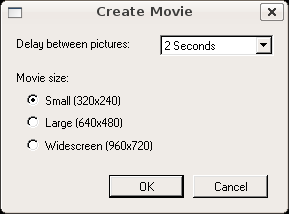
Another nice feature of picasa was its ability to create AVI(Movie) file from images in the library , to create avi file first choose images you would like to assemble as movie file the go to (Create -> Movie ) you will find dialog box similar to this choose dealy time and Movie size and press ok to start creating movie file from images selected.
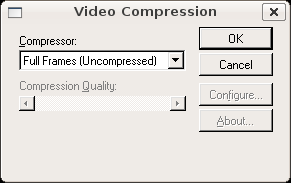
After pressing ok button you will find another dialog box similar to this asking for some other details on pressing "OK" movie of the images selected would be created. As mentioned before the movie created is in AVI Format .
Another great feature i really liked in Picasa was Export as Web Page feature , on selecting a group of images from the library and selecting Folder -> Export as Webpage or Pressing (Ctrl + W) you will get a couple of dialog boxes asking for how web page should look after completing these steps you would find all the images shown in the default web browser as web page which then could be uploaded .
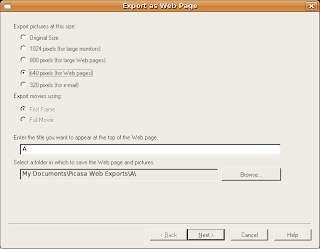 Dialog box asking for image size in web page
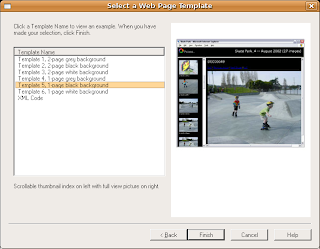 Dialog box asking which template to use for web page(How web page should look)
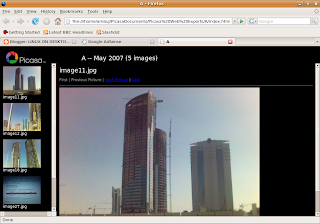 Finally this is how web page of selected images looks
Overall Picasa is an extremely professional application for Photo Management that provides a host of impressive features ,it is availability of quality applications like picasa that encourages people to use Linux on desktop . However picasa is still a Windows application that runs on Linux using compatibility layer and so there are some minor issues with application stability and it would be really nice to see Google develop native version of Picasa for Linux .
There are two major photo management software available on Linux
1.) F-Spot
2.) Google Picasa
While F-Spot is native Linux application written using mono libraries and actively
F-Spot : - F-Spot is a photo management software for Gnome Desktop environment in Linux , it has been created using C# language using Mono framework , it was started by Ettore Perazzoli and is now maintained by Larry Ewing . It is being developed by Novell , and inspite of being not a final stable 1.0 release it is packaged with a large number of Linux distributions including Mandriva,Ubuntu(Check) . F-Spot supports all major photographic image formats , including JPEG, PNG, TIFF, DNG and several vendor-specific RAW formats (CR2, PEF, ORF, SRF, CRW, MRW and RAF). Other supported file types are GIF, SVG and PPM. However, as of 2006, the RAW formats were not editable with F-Spot.
The Clean Default interface of F-SpotThe first thing that strikes you when you start using F-Spot is its clean simple interface , its interface is not jazzy as Google Picasa or iPhoto but simple enough to be usable . Now some would say comparison with Google Picasa is bit premature since it is still in early stage of development compared to Google Picasa which is mature final release , however it is powerful enough to be at least grouped with Google picasa and iPhoto .
On connecting camera dialog box asking to import all photos in camera into F-SpotSince it is default application for Photo Management in many Linux distributions , so on connecting camera or photo stick one gets option of loading images into F-Spot library.
Timeline at top of F-Spot InterfaceOn selecting Import Source , dialog shows operation of adding images from source(USBDISK in this case) to F-Spot libraryTo add photos to F-Spot library chose (File->Import ) and select the folder you want to import , all the images in the folder are imported into F-Spot library and images are shown as thumbnail.
By default all the images imported into the F-Spot library are kept in $HOME/Photos (Photos directory in your home folder ) which is further subdivided into different months which is further divided into dates . All the photos taken on a particular date are grouped in same directory of that date .
F-Spot has a full-screen mode allowing you to view your photos on entire screen , There is also a slide show option which enables one to view all the images present in the F-Spot library as a slide-show (very similar to slide show of presentation programs) .
Meta Data dialog box showing information about image fileOn Choosing a image you will find there is sliding bar at the bottom of a screen which allows you to conveniently zoom into or out of image .
F-Spot offers basic image editing features like Removing Red Eye , Cropping a selected area of image ,an interesting one - Converting Image to Black & White , Converting photos to sepia-tones adjusting colour , saturation hue , rotating image etc . However these image editing features are bit difficult to use and arent quite perfect you could use them for some light editing but i would recommend using Gimp for photo editing. Gimp has been around for quite some time and its features parallel those of photoshop and besides this it is free and comes preloaded with most Linux distributions .
Now besides organizing photos into different months and day , you can also organize photos using tags . Now by default F-Spot comes with four different tags ( Favorites , People , Hidden , Places ,Events ) you can also create more tags from (Tags -> Create tags) you can group one photo in more than on tag . Now i like this tag feature of organizing photo as this is like tags in blogs .You can tag different photos by dropping photos in the particular tag shown in the left side of screen or by dropping tags on photos .
Now besides organizing photos on the hard disk , you can also upload photos to Flickr which is an online photo library , Go to File -> Export -> upload to Flickr to upload photos to Flickr website .
Besides uploading photos to Flickr website you can also create a CD of your images by choosing File -> Export -> Export to CD option .Now F-Spot doesnt come with CD-Burning tool but uses Gnomes CD Burning tools to burn CD .
Overall F-Spot is a nice application that has a lot of potential , considering it is still in early version of development this is one application to look forward to , it is by no means perfect right now searching , image editing are some features that need a considerable amount of improvement but overall it is pretty usable .
Google Picasa : - Google Picasa is one of the more user friendly photo management software available , it is available on both Windows and Linux . It runs on Linux on top of Application Layer called Wine that allows Windows application to run on Linux . However this has some disadvantage firstly some windows application dont work as well as they do on windows , there are occasional application crashes, application freezes , also UI is bit less responsive however applications are still usable .
Anyways Google Picasa isnt shipped with most of the Linux distributions also you are unlikely to find it in repositories of various Linux distribution since it is a commercial close source product . Anyways you can get Google Picasa from the following website address : - http://picasa.google.com/linux . however it still in beta stage on Linux platform .
This is how Picasa LooksThe first thing that you notice when you run Google Picasa for first time is its user friendly interface ,its one of the better looking application thats available on Linux .The first time you start Picasa it asks for location where it should start looking for images and catalog them , now it offers only two option either to scan entire hard disk or only desktop , this is something which could be improved there should be another option of scanning particular folders instead of entire hard disk anyways after you specify one of the two options images are loaded into Picasa library .
Since Picasa is windows application running on Linux maybe because of this reason i found Picasa interface somewhat slow on my old laptop(Cel 1.4 GHz 256 Megabytes of ram ) now if you compare speed F-Spot beats Picasa hands down. Also the interface wasnt very responsive i had hell of a difficulty moving sidebars ():)
After the scanning, adding of images to library is over all the images along with folder they were contained in are shown in ascending order of date when they were created . All the images in the library are shown as thumbnail allowing easy browsing of images. Now one thing that was interesting was you could change the size of thumbnails ,by moving the slide bar at the bottom of interface , this is particularly useful if you have large amount of image files and you want to see maximum number of image files at once .
Picasa offers a number of image editing features like color enhancement , red eye reduction , cropping images to particular size etc . Now when you select a image you get a screen similar to this offering a variety of image enhancement features which you could use to improve quality of image .
After selecting a image you can easily zoom into or out of image using slide bar at bottom of interfaceBasic Fixes has the following enhancements : -
Tuning provides the following options : -Effects provide a number of different effects to modify the features of photo : -
Now large number of image editing features are available in Picasa and there shouldnt be any need for any external image editing program .
At the bottom of interface you would find buttons allowing you to easily Print , Blog ,Email ,Collage Photos there are number of other features which are not being documented here .
Picasa Make Collage FeatureNow i tried Blogthis button but to my dismay this feature didnt seem to work. However Print and Email photos did work well. I was pleasantly surprised to note that Picasa offered to Email photos using Gmail account apart from allowing using POP3 accounts and some Picasa Mail(Couldnt check it out) ,this can be really helpful for someone without a POP3 account(most of us) .
Picasa Email FeatureBesides all the image editing features , you can also view images in the library as slide show or screen saver .
A Slide-Show Session in ProgressAfter pressing ok button you will find another dialog box similar to this asking for some other details on pressing "OK" movie of the images selected would be created. As mentioned before the movie created is in AVI Format .
Another great feature i really liked in Picasa was Export as Web Page feature , on selecting a group of images from the library and selecting Folder -> Export as Webpage or Pressing (Ctrl + W) you will get a couple of dialog boxes asking for how web page should look after completing these steps you would find all the images shown in the default web browser as web page which then could be uploaded .
Dialog box asking for image size in web pageDialog box asking which template to use for web page(How web page should look)Finally this is how web page of selected images looks Overall Picasa is an extremely professional application for Photo Management that provides a host of impressive features ,it is availability of quality applications like picasa that encourages people to use Linux on desktop . However picasa is still a Windows application that runs on Linux using compatibility layer and so there are some minor issues with application stability and it would be really nice to see Google develop native version of Picasa for Linux .
Article written by Ambuj Varsney
(C) 2007, Ambuj Varshney
For Linux On Desktop Blog (http://linuxondesktop.blogspot.com)
(C) 2007, Ambuj Varshney
For Linux On Desktop Blog (http://linuxondesktop.blogspot.com)
Available link for download
.png)

Saturday, December 17, 2016
Making your Ubuntu 7 10 Desktop look like MAC OS X Leopard
Making your Ubuntu 7 10 Desktop look like MAC OS X Leopard
Making your Ubuntu 7.10 Desktop look like MAC OS X Leopard
 Another screenshot showing Menu in the AWN Dock
Technorati Tags:
Ubuntu, Themes, Ubuntu Themes, Mac OS X, Ubuntu Customization, Linux, Desktop Linux, compiz, beryl
READ THE UPDATED VERSION OF THIS ARTICLE FOR UBUNTU 8.04 HERE
MAC OS has been traditionally known for their impressive graphical interface and stability . Now even though i have been an avid Linux follower over the past 9 years I have been using Linux , still i find my self attracted to MAC OS .
Now even though these days its possible to run Hackintosh on normal Intel hardware , but still its not stable and well there are hardware compatibility issues . So well other alternative to using MAC OS is either to purchase MAC hardware(which would be naturally expensive) and run full fledged MAC OS or you could tweak and customize your Ubuntu desktop to look more like MAC OS X .
In this tutorial i describe step by step how to make your ubuntu desktop look more like MAC OS X Leopard :) .
Step 1 :- Downloading LeopardX Icon Theme
First you need to download LeopardX theme (hosted on gnome-looks.org) from the following website : -
or you could download directly from this link :
http://rapidshare.com/files/73251200/LeopardX-V2.6.tar.gz
Gnome - Looks page : http://gnome-look.org/content/show.php/LeopardX?content=64070
It will download a file named LeopardX-V2.6.tar.gz , now extract this file using file-roller to any temporary directory that you would use to house the files we would be using for the customization.(In my case its $HOME/Leopard) or if you want to use console application you could use the following command to extract the file to Leopard directory (Make sure you create the directory before doing this step)
For me to extract the file to $HOME/Leopard directory(already created) command would be : -
2. Downloading Mac4Lin GTK Theme
Now similarly download Mac4Lin GTK theme from the following website and extract it to the folder created above ($HOME/Leopard)
Download : http://rs18.rapidshare.com/files/71511264/Mac4Lin_GTK_Aqua_v0.3.tar.gz
We need to download the cursor set for our new theme , you can download the cursor set from t he following website :
http://gnome-look.org/content/show.php/Shere+Khan+X?content=57588
After downloading the cursor set extract cursors to the directory created in the first step.
4. Combining the Downloaded Files into a Single Theme Package
Now after completing the above steps go to the directory( cd $HOME/Leopard for me ) in the Terminal and issue the following command to combine the three theme files into a single .tar.gz archive .
5. Installing Theme Package
Now to install the theme package we have created in the above step , go to (System -> Preferences -> Appearance) and click Install and point to our newly created MyTheme.tar.gz archive.
This should start installing the theme package (Cursors/Icons/Theme) once installation is completed . Chose Custom in theme and click on Customize .You will find a window like this: Customize Dialog Box
In this window in Icons chose LeopardX , in Controls Mac4Lin_GTK_Aqua_v0.3 , in Window Border Mac4Lin_GTK_Aqua_v0.3 and in Pointers White Cursor .
If you have followed the steps properly the theme and icons should have been installed , and you should be able to see the new theme applied to your default desktop .
6. Changing the Log In Screen / GDM Theme
To change the Log In Screen/GDM Theme download the package from website listed below : http://gnome-look.org/content/show.php/OSX+Session+Login?content=68346
After downloading the package , open (System -> Administration -> Log in Window ) and there go to Local and click on Add and point to the downloaded theme package (osx-login.tar.gz) . Now you would find OSX-Login theme listed in the window , select OSX-Login and close the window . Logout and Login again you should find the new theme installed .
 Log-in Window allows easy changing of the Login Screen Theme
7. Enabling Compiz-Fusion
IMPORTANT : - Enabling Compiz-Fusion is essential if you want to use Screenlets , Avant Window Manager Properly .
Unlike previous releases of Ubuntu where one had to manually download and install compiz,beryl etc (Compiz Fusion is composite window manager that provides best features of Compiz and Beryl) from Repositories if one wanted to have glitzy visual effects .
Ubuntu 7.10 comes with Compiz Fusion pre-installed and on supported hardware offers a wide array of Visual Effect . Now depending on graphic hardware of computer one could chose from three level of Visual Effect (From System -> Preferences -> Appearance )
None : - This mode causes Ubuntu to use Metacity instead of Compiz Fusion , with no visual effect
Basic : - Has only simple visual effects like shadows , fading windows-menus etc
Advanced : - Recommended for PC with descent graphic hardware , enables effects like wobbly windows, transparency , animated workspace switching etc Visual Effect Dialog Box
However , compiz-fusion is capable of much more and you can enable more desktop effects /customize compiz by typing the following command in the terminal window : -
After installation is over , open Terminal from (Applications -> Accessories -> Terminal ) and issue the following command to install emerald which is necessary for using themes in compiz .
After installation is over download MacOS X Emerald theme from this link : http://gnome-look.org/content/show.php/Mac4Lin+Leopard+Emerald+Theme?content=68409
Now open (System -> Preferences -> Emerald Theme Manager )
After Emerald theme manager opens click on import and point to the downloaded theme package from withing the Theme Manager , you will find Mac4Lin Theme listed select the theme , click on refresh and quit the application .
 Emerald Theme Manager
8. Installing Avant Windows Navigator
IMPORTANT : - To use AWN Compiz-Fusion should be up and running as mentioned in the step above
Avant Windows Navigator is cool little tool that allows you to have a cute looking dock at the bottom of the screen . Even though AWN is still very buggy, still because it is so feature rich and cool looking you could install it .
Before we begin installing first ensure Software Sources are in order by going to ( System -> Administration -> Software Sources ) go to the Updates and the window should like the image below with in Ubuntu updates box " first , second and fourth option " enabled .
 Software Sources Dialog box
To install add in the following line at the end of file /etc/apt/sources.list by opening the gedit editor with the following command .
and LINE TO ADD : -
Now you could customize AWN by choosing to add more applets , configuring 3D effects for AWN etc by going to AWN Manager ( System -> Preferences -> Awn Manager )


Screenlets gives user a collection of impressive widgets that can be placed on desktop this is similar to feature available on Windows Vista and Mac OS X Dashboard , it gives impressive look to the desktop.
To install Screenlets type in the following command in the terminal window :
First we need to add repository where the Screenlets binary is located , to do so open gedit with superuser permission by typing the following command in the terminal window :
and add the following line at the bottom of the file :
 Screenlets configuring dialog box
10. Getting MAC OS X Leopard Wallpaper
Finally this is how my desktop looks after all the tweaking and installing : -
 My Ubuntu Desktop
andNow even though these days its possible to run Hackintosh on normal Intel hardware , but still its not stable and well there are hardware compatibility issues . So well other alternative to using MAC OS is either to purchase MAC hardware(which would be naturally expensive) and run full fledged MAC OS or you could tweak and customize your Ubuntu desktop to look more like MAC OS X .
In this tutorial i describe step by step how to make your ubuntu desktop look more like MAC OS X Leopard :) .
Step 1 :- Downloading LeopardX Icon Theme
First you need to download LeopardX theme (hosted on gnome-looks.org) from the following website : -
or you could download directly from this link :
http://rapidshare.com/files/73251200/LeopardX-V2.6.tar.gz
Gnome - Looks page : http://gnome-look.org/content/show.php/LeopardX?content=64070
It will download a file named
For me to extract the file to $HOME/Leopard directory(already created) command would be : -
tar -xvzf LeopardX-V2.6.tar.gz $HOME/Leopard
2. Downloading Mac4Lin GTK Theme
Now similarly download Mac4Lin GTK theme from the following website and extract it to the folder created above ($HOME/Leopard)
Download : http://rs18.rapidshare.com/files/71511264/Mac4Lin_GTK_Aqua_v0.3.tar.gz
and to extract it to $HOME/Leopard director(already created)
3. Download Cursor Theme Packagetar -xvzf Mac4Lin_GTK_Aqua_v0.3.tar.gz $HOME/Leopard
We need to download the cursor set for our new theme , you can download the cursor set from t he following website :
http://gnome-look.org/content/show.php/Shere+Khan+X?content=57588
After downloading the cursor set extract cursors to the directory created in the first step.
4. Combining the Downloaded Files into a Single Theme Package
Now after completing the above steps go to the directory( cd $HOME/Leopard for me ) in the Terminal and issue the following command to combine the three theme files into a single .tar.gz archive .
tar cvfz MyTheme.tar.gz LeopardX Mac4Lin_GTK_Aqua_v0.3 Shere_Khan_X/
5. Installing Theme Package
Now to install the theme package we have created in the above step , go to (System -> Preferences -> Appearance) and click Install and point to our newly created MyTheme.tar.gz archive.
This should start installing the theme package (Cursors/Icons/Theme) once installation is completed . Chose Custom in theme and click on Customize .You will find a window like this:
Customize Dialog BoxIf you have followed the steps properly the theme and icons should have been installed , and you should be able to see the new theme applied to your default desktop .
6. Changing the Log In Screen / GDM Theme
To change the Log In Screen/GDM Theme download the package from website listed below : http://gnome-look.org/content/show.php/OSX+Session+Login?content=68346
After downloading the package , open (System -> Administration -> Log in Window ) and there go to Local and click on Add and point to the downloaded theme package (osx-login.tar.gz) . Now you would find OSX-Login theme listed in the window , select OSX-Login and close the window . Logout and Login again you should find the new theme installed .
Log-in Window allows easy changing of the Login Screen Theme7. Enabling Compiz-Fusion
IMPORTANT : - Enabling Compiz-Fusion is essential if you want to use Screenlets , Avant Window Manager Properly .
Unlike previous releases of Ubuntu where one had to manually download and install compiz,beryl etc (Compiz Fusion is composite window manager that provides best features of Compiz and Beryl) from Repositories if one wanted to have glitzy visual effects .
Ubuntu 7.10 comes with Compiz Fusion pre-installed and on supported hardware offers a wide array of Visual Effect . Now depending on graphic hardware of computer one could chose from three level of Visual Effect (From System -> Preferences -> Appearance )
None : - This mode causes Ubuntu to use Metacity instead of Compiz Fusion , with no visual effect
Basic : - Has only simple visual effects like shadows , fading windows-menus etc
Advanced : - Recommended for PC with descent graphic hardware , enables effects like wobbly windows, transparency , animated workspace switching etc
Visual Effect Dialog BoxHowever , compiz-fusion is capable of much more and you can enable more desktop effects /customize compiz by typing the following command in the terminal window : -
sudo apt-get install compizconfig-settings-managerAfter completing above step , you can customize compiz by going to System > Preferences > Advanced Desktop Effects Settings .
After installation is over , open Terminal from (Applications -> Accessories -> Terminal ) and issue the following command to install emerald which is necessary for using themes in compiz .
sudo apt-get install emerald
After installation is over download MacOS X Emerald theme from this link : http://gnome-look.org/content/show.php/Mac4Lin+Leopard+Emerald+Theme?content=68409
Now open (System -> Preferences -> Emerald Theme Manager )
After Emerald theme manager opens click on import and point to the downloaded theme package from withing the Theme Manager , you will find Mac4Lin Theme listed select the theme , click on refresh and quit the application .
Emerald Theme Manager 8. Installing Avant Windows Navigator
IMPORTANT : - To use AWN Compiz-Fusion should be up and running as mentioned in the step above
Avant Windows Navigator is cool little tool that allows you to have a cute looking dock at the bottom of the screen . Even though AWN is still very buggy, still because it is so feature rich and cool looking you could install it .
Before we begin installing first ensure Software Sources are in order by going to ( System -> Administration -> Software Sources ) go to the Updates and the window should like the image below with in Ubuntu updates box " first , second and fourth option " enabled .
Software Sources Dialog boxTo install add in the following line at the end of file /etc/apt/sources.list by opening the gedit editor with the following command .
gksu gedit /etc/apt/sources.list
and LINE TO ADD : -
deb http://download.tuxfamily.org/syzygy42/ gutsy avant-window-navigatorand after adding the above line issue the following command in the terminal window (Applications -> Accessories -> Terminal )
deb-src http://download.tuxfamily.org/syzygy42/ gutsy avant-window-navigator
wget http://download.tuxfamily.org/syzygy42/reacocard.asc -O- | sudo apt-key add -Now we begin installing AWN by issuing the following command in the terminal window :
sudo apt-get update
sudo apt-get upgrade
sudo apt-get install avant-window-navigator-bzr
and , To install additional applets for AWN
sudo apt-get install awn-core-applets-bzrNow after completing above mentioned steps AWN should be properly installed , To Launch AWN go to (Applications -> Accessories -> Avant Window Navigator )
Now you could customize AWN by choosing to add more applets , configuring 3D effects for AWN etc by going to AWN Manager ( System -> Preferences -> Awn Manager )
Three ScreenShots of AWN Manager , one with Applets Tab opened and other with Themes tab opened
Though the theme which AWN comes with preinstalled is also good , you might like to try this its cool and very Mac like
http://rapidshare.com/files/71511920/Transparent.tgz.html
you could install this theme through AWN Manager .
This is how my AWN Dock looks(with the above theme installed) like : -
 AWN-DOCK
9. Installing Screenlets
IMPORTANT : - To use Screenlets Compiz-Fusion should be up and running as mentioned in the step above
http://rapidshare.com/files/71511920/Transparent.tgz.html
you could install this theme through AWN Manager .
This is how my AWN Dock looks(with the above theme installed) like : -
AWN-DOCK9. Installing Screenlets
IMPORTANT : - To use Screenlets Compiz-Fusion should be up and running as mentioned in the step above
Screenlets gives user a collection of impressive widgets that can be placed on desktop this is similar to feature available on Windows Vista and Mac OS X Dashboard , it gives impressive look to the desktop.
To install Screenlets type in the following command in the terminal window :
First we need to add repository where the Screenlets binary is located , to do so open gedit with superuser permission by typing the following command in the terminal window :
gksu gedit /etc/apt/sources.list
and add the following line at the bottom of the file :
deb http://download.tuxfamily.org/screenlets gutsy screenletsNow quit the gedit text editor and type in the following command in the terminal window :
sudo apt-get updateNow , After the installation is over you can add Widgets/Screenlets on your desktop by going to (System -> Preferences -> Screenlets ) , you will find a dialog box like this from where you could add Screenlets onto the desktop .
sudo apt-get install screenlets
Screenlets configuring dialog box10. Getting MAC OS X Leopard Wallpaper
Finally you can get MAC OS X Leopard wallpaper from the following website : http://appleology.com/images/space-desktop.png
Finally this is how my desktop looks after all the tweaking and installing : -
My Ubuntu DesktopAnother screenshot showing Menu in the AWN DockTechnorati Tags:
Ubuntu, Themes, Ubuntu Themes, Mac OS X, Ubuntu Customization, Linux, Desktop Linux, compiz, beryl
Article Written by : Ambuj Varshney (blogambuj@gmail.com)
For Desktop on Linux Blog , http://linuxondesktop.blogspot.com
(C) 2007 , Ambuj Varshney
For Desktop on Linux Blog , http://linuxondesktop.blogspot.com
(C) 2007 , Ambuj Varshney
Available link for download
Monday, December 5, 2016
Mengaktifkan Remote Desktop pada Windows 7 atau Vista
Mengaktifkan Remote Desktop pada Windows 7 atau Vista
Mengaktifkan Remote Desktop pada Windows 7 atau Vista - untuk pengguna windows7 atau vista, unutk mengenal beberapa fasilitas yang di sedikan oleh os ini, anda kudu membaca dan mempraktekan bagaimana si fasilitas ini bisa dengan mudah di gunakan, mungkin dengan bertanya atau dengan membaca dari sumber yang benar atau dari tutorial seperti yang ane tulis ini.

Untuk tahap - tahap yang akan anda lakukan sebenarnya cukup mudah seperti tutorial yang akan di bahas di bawah ini :
Untuk tahap - tahap yang akan anda lakukan sebenarnya cukup mudah seperti tutorial yang akan di bahas di bawah ini :
- Mengaktifkan Remote Desktop pada Windows 7 atau Vista
Available link for download
Saturday, October 8, 2016
Melakukan Remote Desktop Connection Dengan TeamViewer
Melakukan Remote Desktop Connection Dengan TeamViewer

Kita dapat mengontrol sebuah komputer dari jauh, dengan menggunakan perangkat lunak tertentu dan jaringan Internet. Masalahnya, kebanyakan perangkat lunak tersebut memerlukan banyak pengaturan yang bersifat teknis dan terlalu rumit. Namun, kini tersedia perangkat lunak yang dapat membantu kita mengontrol komputer secara remote dengan sangat mudah.
TeamViewer adalah perangkat lunak yang memungkinkan kita untuk melakukan desktop sharing melalui Internet. Kita dapat mengontrol komputer partner kita yang berada ditempat lain, dan melakukan berbagai hal. Semua ini sangat mudah untuk dilakukan, dan bahkan kita tidak perlu pusing dengan hal-hal yang bersifat teknis seperti firewalls, IP address, ataupun NAT.
Memang kita dapat menemukan banyak perangkat lunak yang serupa, tapi TeamViewer menyediakan solusi untuk semua jenis kebutuhan. TeamViewer sangat sederhana dan mudah untuk digunakan. Kita bahkan tidak perlu meng-install nya terlebih dahulu. Kita hanya perlu menjalankan perangkat lunak ini pada komputer kita, dan tentunya pada komputer yang ingin kita kontrol dari jauh.
Kita dapat melakukan banyak hal dengan bantuan TeamViewer. Sebagai contoh, kita dapat memperlihatkan desktop kita kepada partner kita, serta berbagi demo produk, presentasi, dan sebagainya. Kita juga dapat memanfaatkan TeamViewer untuk mengontrol sebuah server.
TeamViewer juga menyediakan fitur-fitur tambahan yang sangat bermanfaat, contohnya fitur file transfer, yang memudahkan kita dalam meng-copy file serta folder antara komputer kita dengan komputer partner kita.
Kita dapat mengunduh dan menggunakan TeamViewer secara gratis, asalkan untuk keperluan non-komersil. Di website resminya www.TeamViewer.com tersedia beberapa versi TeamViewer, yaitu TeamViewer full version, serta beberapa versi lain untuk keperluan yang lebih spesifik, seperti untuk memberikan layanan customer service, untuk mengontrol server, dan sebagainya.
Available link for download
Subscribe to:
Posts (Atom)