Showing posts with label 7. Show all posts

Thursday, March 30, 2017

Menambah Gadget Sidebar Windows 7 ke XP

Menambah Gadget Sidebar Windows 7 ke XP


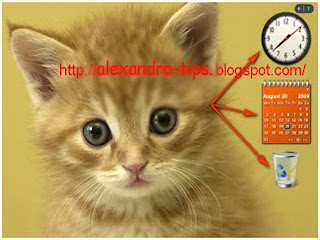
Apa sabar sobat setiaku yang super sekali, dipostingan saya kali ini kita akan membahas tentang bagaimana menambah gadget sidebar windows 7 ke XP..mungkin ada yang ingin menambahkan salah satu fitur dari Windows 7. salah satu fitur yang bisa di tambahkan ke desktop adalah sidebar gadget, seperti gambar di bawah ini.

menambah gadget sidebar windows 7 ke xp


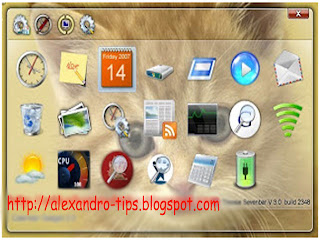
sobat bisa menghias layar desktop komputer dengan memasang sidebar Windows 7, kemudian mengisinya dengan gadget yang telah tersedia di panel gadget sidebar tersebut. Aplikasi ini berjalan dengan normal di komputer yang telah teriinstal Windows XP.

menambah gadget sidebar windows 7 ke xp


Cara menambah gadget sidebar windows 7 ke xp cukup menggunakan aplikasi Thoosje windows 7 sidebar 1.0 yg dapat di download dengan mengunjungi linkberikut...Aplikasi ini tidak terlalu menguras resource komputer sobat jika dibandingkan dengan menginstal themes vista inspirate. Untuk mengatur gadget yang akan ditambahkan ke sidebar, cukup dengan menekan tombol plus (+) di sebelah kanan atas sidebar. beberapa gadget yang bisa ditambahkan adalah jam analog, jam digital, kalender, folder, dan beberapa gadget lainnya.
 

sekiranya artikel ini berguna buat teman-temanku semua..

Available link for download

Thursday, March 16, 2017

Magic Disc v2 7 106 Freeware

Magic Disc v2 7 106 Freeware


Apa anda kekurangan CD ROM ?? Kali ini saya akan membahasnya dan mensharenya.. MagicISO Virtual CD/DVD -> Magic Disc v2.7.106 - Freeware Merupakan - salah satu sebuah software utilities yang dapat berfungsi untuk membuat CD/DVD virtual ke dalam Komputer Anda. Software ini bekerja seperti CD/DVD ROM dan juga bisa membuat / menjalankan program / bermain game dan mendengar musik dari virtual CD Room Anda.


Screenshot : Magic Disc v2.7.106

Cara penggunaannya juga sangat sederhana :
-Download dulu MagicDiscnya (download dibawah postingan)
-Lalu install magicdisnya
-Jalankan Magic disc pada startup toolbar pada pojok kanan bawah ber-ikon Cd
-Masukan CD Game / CD Musik Kamu. kalo sudah klik kanan icon pilih Make CD/DVD Image
-Pilih ISO Format
-Kemudian Make , Kalo udah 100%
-Keluarkan kasetnya, jalankan magic disc pada startup toolbar pada pojok kanan bawah ber-ikon Cd
-Klik kanan icon tersebut pilih Vitual CD / DVD Rom seperti gambar diatas
-Pilih Virtual CD/DVD Rom. kemudian pilih no media. cari file dimana kamu save isonya tadi sudah deh
Sukses deh!

Bagi yang mau mencobanya download dibawah :
Magic Disc v2.7.106 - Freeware
via ziddu - 1.47 Mb


Selamat mencoba !!

Available link for download

Wednesday, March 15, 2017

Membuat file ISO dengan Nero 7

Membuat file ISO dengan Nero 7


Bagi temen - temen yang kesulitan membuat file iso, pake aja nero 7. lebih mudah buatnya:
Ini langkah - langkahnya :

1. Buka nero anda, pilih make data CD ataupun DVD


2. Masukkan file yang akan dibuat file iso dengan click add.


3. Klick next
pastikan currrent recorder berada di image recorder.


4. lanjut dengan klik burn.


5. Save As type pilih *.iso jangan yang *.nrg

kelar dech... silakan di coba.. semoga bermanfaat.


Available link for download

Monday, February 27, 2017

Microsoft comes up with Google Latitude for their new Windows Phone 7

Microsoft comes up with Google Latitude for their new Windows Phone 7


Getting where your position or even your friend exact position? planning on hang out together somewhere with your friend and need to spread the exact location to your community? well, thats all is possible if you are using android or iOS smartphone, Google Latitude is the easy solution for all of that problems. But how if you are windows mobile phone users?


If that so this is the good news for you. Microsoft comes up with Google Latitude for their new Windows Phone 7. So now you can do the same thing that android or iOS smartphone users can do.

To use its features, first you need to send a text message to a group of your friend from your contact directory through the app contain an invitation. Once your friends is accept your invitation you are now capable to track their location through a map.

By this new app you also can communicate into your group by setting up your status message that was viewable by your group. Seems like smartphone now getting into social network application, follow the successful footsteps of facebook. You can view your group position in a time set limit that you set before. After the time is end up you and your group will not capable anymore to tracking up your group location.

For now this app is only compatible for windows phone 7 but Microsoft said this app has planned will be ported to another smartphone platforms.

Available link for download

Saturday, February 18, 2017

Mobile Master 7 7 4

Mobile Master 7 7 4


alt Mobile Master is a mobile phone software tool for mobile phone management and SMS communication that can be used to exchange data between mobile phone and PC. Via cable, infrared, or Bluetooth, the system automatically detects the mobile phone and assigns it its own profile, making it possible to manage several phones without creating chaos with the data. An assistant helps with the settings. Even users with no prior knowledge can, for example, download their phone’s address book data to the PC with just a few mouse clicks. Edit and synchronize calendar entries (appointments and tasks). Send, read, archive SMS Note: the SMS Servant is included in the Mobile Master installation but requires an extra license. Logo-Editor, modify ring tone. Copy Station for transmitting your address book easily from one phone to the other. Mobile Master Agent: reach always the important functions easily and start e.g. Mobile Master automatically as soon as your mobile phone is connected to the PC.

Runs on /Synchronizes via: Windows 7, Windows Vista, Windows XP, Windows 2000
Size: 20.9 MB


Available link for download

Wednesday, February 8, 2017

Membuat Shortcut Untuk Mengunci Layar Windows 7

Membuat Shortcut Untuk Mengunci Layar Windows 7


Ada banyak cara di mana sobat dapat mengunci layar komputer sobat. Cara populer yang tercepat untuk menguncinya adalah dengan menggunakan cara pintas keyboard. Cara pintas keyboard yang digunakan untuk mengunci layar komputer yaitu Win + L. Beberapa dari sobat mungkin memilih untuk menggunakan mouse untuk menguncinya. Dan tentu saja banyak orang ingin menggunakan kedua pilihan diatas.
Ada metode lain di mana sobat dapat mengunci layar komputer sobat dengan mudah dan cepat. Caranya yaitu dengan membuat shortcut untuk mengunci layar komputer sobat di Windows 7. Sobat dapat membuat shortcut untuk mengunci layar komputer di Windows 7, XP dan Vista juga. Ikuti langkah-langkah dalam rangka untuk membuat shortcut untuk mengunci layar komputer di Windows 7 serta edisi lainnya:
Klik kanan pada desktop di mana Anda ingin membuat shortcut.
Arahkan ke New > Shortcut
Ketik Text ini di isian textbox Shortcut (text ini akan berjalan dengan baik di Windows XP meskipun tampilan layar akan sedikit berbeda)

rundll32.exe user32.dll, LockWorkStation

Klik pada tombol Next.

Ketik nama Shortcut sobat.

Klik pada tombol Finish.

Selamat sobat telah berhasil mengunci workstation sobat. Cukup klik pada shortcut setiap kali sobat ingin mengunci layar komputer.
sumber :  http://armanks.blogspot.com/2011/11/membuat-shortcut-untuk-mengunci-layar.html

Available link for download

Tuesday, February 7, 2017

Milestone Overclock v1 4 7 Apk Download

Milestone Overclock v1 4 7 Apk Download


Milestone Overclock v1.4.7 Apk Download

Milestone Overclock v1.4.7 Apk Download

Description

Milestone Overclock app enables overclocking without flashing new ROMs or kernels on phones with TI OMAP3xxx processors like Motorola Milestone 1/2, Droid 1/2/X, XT*, Defy, Flipout, Samsung Galaxy A/Beam and Archos A70/A101.

The app requires ROOT and Stock (default) ROM.

Milestone Overclock was created in the scope of the open source project. Projects page http://code.google.com/p/milestone-overclock


Changelog

Milestone Overclock 1.4.7:
- Support Motorola XT711, Defy running Chinese Froyo
- Fixed race condition between insmod and setting module parameters
- Added sr_adjust_vsel field when reading the /proc/overclock/mpu_opps table if SMARTREFLEX is enabled

Developer: Tiago Sousa
Category: System
Latest version: 1.4.7
Total versions: 1
Submitted: 19 Mar 2011
Updated: 19 Mar 2011
File Size : 93 Kb

Download Milestone Overclock v1.4.7 Apk
Milestone Overclock v1.4.7 Apk Download

Available link for download

Tuesday, January 24, 2017

Microsoft Windows 7 Free Codec Download to view RAW camera files or Do you Shoot RAW

Microsoft Windows 7 Free Codec Download to view RAW camera files or Do you Shoot RAW


I have to admit I was a bit surprised at such forward thinking at Microsoft, but they have released codecs, which are essentially drivers or software to be able to view RAW camera files in Windows Explorer and Windows Live Photo Gallery.

RAW format is really taking off, and for serious photographers, it is the way to go. This format is generally only available in the more advanced cameras such as DSLRs and higher end point and shoots.

What is the difference between RAW and a .JPG file?

When you take a photo with a digital camera, and save it as a .jpg in the camera, the camera and it’s electronics make assumptions about the photo and make a bunch of exposure and other important decisions about the photo when saved.

With a RAW file, it is almost like going back to the scene and able to retake the photo. You have a lot more control over exposure and thus your lighting and photos can look much better.

I won’t get too technical, but a .jpg file is an 8 bit file which will store about 256 levels of brightness in your photo.

A RAW file is usually a 12 bit size file which can handle about 4,096 levels of brightness for each and every pixel. It does vary by manufacturer and camera model.

So if I have a choice of 256 brightness levels, or 4096, I would take the bigger one any day. What that does is give you a much larger latitude of exposure to work with.

Ever have a photo where the sky is just all washed out, or the shade under the tree is too dark? More exposure levels is what allows you to pull out detail in those areas you would not be able to with only 256 levels.

Here is some more technical information on RAW files if you are interested

Disadvantages?

There are a few things to consider and they are not necessarily disadvantages with shooting photos in RAW.

They do take up a lot of space, the RAW file sizes can be around 25 megabytes vs. around 3 mb for the same photo saved in .jpg.

Also, you do need to process the files a bit differently with software that will edit the RAW files. JPG files are pretty much ready to go unless they need some minor adjusting.

Different Formats for brands of Cameras

The one big problem is there are a lot of RAW formats out there. Each camera manufacturer can have their own, Canon uses .CR2 and Nikon uses .NEF, and there are a bunch more.

Here is a good listing of the different formats for each brand of camera

The nice thing about the ability to view RAW files is that without the codecs, you just see a blank document in thumbnail view. But the the codecs, the RAW files act just like a .jpg or other photo. You can see the little thumbnail, and you can click on it, and see the RAW file in the file preview window. You can enlarge the view, just like all other image files.

Here is a link to download the Microsoft Codecs for RAW viewing.

The codecs work in Windows 7 or Vista with Service Pack 2 installed. Just download, and install, quick and easy. Then go into your Pictures folder where you have some RAW files, and check it out.

If you have a camera capable of shooting RAW, many times you can set it to shoot a .jpg and RAW photo at the same time. This way you can make sure you have a .jpg like you are used to. In addition, you will get a RAW file that you can start to learn how to edit. The main thing you can do with RAW is exposure type changes.


Available link for download

Thursday, January 19, 2017

Mobogenie Latest Version 3 3 7 Free Download for Windows

Mobogenie Latest Version 3 3 7 Free Download for Windows


Mobogenie Latest Version 3.3.7 for Windows:

Mobogenie latest version 3.3.7 is the most recent file at the time of this publication. You can download it directly from the given downloading link below. The downloading link which is given has been brought you from the official site of Mobogenie. So it is an authentic and geniune file and will not create errors while the installation. 
Mobogenie latest version which is given here is for Windows. You can download it only for windows. The given file is not compatible with android OS. So you should download it and install on windows only. If you want to download Mobogenie for android then search these keywords (mobogenie latest version apk for android) on the given search bar.

Mobogenie Latest Version 3.3.7 for Windows

To download latest version of mobogenie for windows, then move to the bottom of this article and click on the given downloading link. When you will click on that link, you will find a small windows where you will be guided with an option that is "save file". When you will click on that option then your downloading file will be proceed to further process.
Download

Available link for download

Thursday, January 12, 2017

MiniLyrics 7 5 21 Multilanguage

MiniLyrics 7 5 21 Multilanguage


MiniLyrics 7.5.21 Multilanguage

Features:

Automatic lyrics display for your favorite songs.
Never expired trial version.
Cool skins.
Wild compatibility for 13 players.

MiniLyrics supports:

Winamp.
Windows Media Player.
Foobar2000.
Apple iTunes.
RealPlayer.
Quintessential Player.
Musicmatch Jukebox.
MediaMonkey.
The KMPlayer.
JetAudio.
Yahoo! Music Engine.
J. River Media Center.
J. River Media Jukebox.
XMPlay.
BSPlayer.


LINK DOWNLOAD :

FREE DOWNLOAD MINILYRICS 7.5.21

pass : yonggi

Available link for download

Wednesday, December 28, 2016

Memory Card Data Recovery Software Free Download Ali Khan 7 43 PM Download Memory Card Data Recovery Software Free Download

Memory Card Data Recovery Software Free Download Ali Khan 7 43 PM Download Memory Card Data Recovery Software Free Download


Memory Card Data Recovery Software Free Download

 
7:43 PM
Download

Memory Card Data Recovery Software Free Download

Memory card data recovery software is now released with the name of CardRecovery for windows. Card recovery software used to recover photos/images/pictures and other important data from SD, Micro and other camera memory cards instantly. Memory card data recovery software provides you excellent features to recover data from flash memory cards instantly. Card recovery is worlds leading software that can easily restore images/pictures/photos right from your card reader. Digital media and USB flash drives are appears as latest technology devices available in small size and provides maximum size than hard drives and other storage media. Digital media like phone, memory cards and USB flash drives contains most important and personal data of user.
The accidental formatting, corrupting, deleting are the mostly faced problems by the users now a days. Card recovery provides simple, fast, secure and instant way to recover music, photos, videos and other document files without wasting time and money as well. Card recovery supports almost all types of memory cards with addition of all company products. Card recovery 6.10 is especially designed for windows 8 users with both 32-bit and 64-bit environments. Card recovery is able to recover lost, deleted, corrupted and formatted partitions easily. There are various popular data recovery software available as free download such as R-studio, Recuva, Get data back, Power data recovery, EaseUS Todo backup free, Paragon backup and recovery and lots of more.

Supported Memory Card Types:

Card recovery software supports wide range of memory card, flash readers and other removable media memory devices. These devices are SD card, M2 card, miniSD card, MicroSD card, secure digital camera card, compact card, micro drive, MMC (multimedia card), flash card, smart card, mobile phone memory, digital camera memory, android phones, USB flash drive, micro SDHC, Micro SD as mobile memory and many others. These card types are supported including with scanning for damaged and deleted files and then recover the seen files easily in your computer desktop.

Supported Memory Card Companies:


Memory card data recovery software is simple, fast and intelligent data recovery software that supports up to all types of companies or manufactures of memory card media. These companies are HP, Kingston, SanDisc, Sony, Samsung, Toshiba, Panasonic, Olympus, A-data, Transcend and many others that are available in market. You can even recover your personal data from all these manufactures because card recovery easily gets the information about the removable media storage with its internal technologies.

Supported Camera and Phone Brands:


Card recovery easily gets information about the removable media storage that is attached with computer. Card recovery database filled with different popular and non popular manufactures, companies and their brands as well. It follows and completes the task given by the user efficiently and instantly. The supported brands and products are Nikon, Sony, Samsung, HP, Olympus, Panasonic, Polaroid, Canon, Kodak, Agfa, NEC, Epson, Sanyo, Ricoh, L.G, Sharp, Android, Blackberry, Toshiba, SanDisc, JVC, Nexus, Motorola, Nokia, HTC and lots of more.

Supported Image Formats:


Card recovery is professional data recovery software that allows instant and accurate picture/photo/image recovery to its users. Card recovery supports all types of simple, standard, camera, mobile phone and other high quality image files and easily gets them back without wasting the time and money of user. Card recovery supports JPG, TIF, JPEG with addition of some RAW material of some specific camera devices. These are Canon CR2, Canon CRW, Fuji RAF, Konica Minolta MRW, Samsung DNG, Sony SRF, Panasonic RAW, Olympus ORF and more others.

Supported Music Formats:


Card recovery also supports some music/audio file formats recovery. Card recovery doesnt support lots of music file extensions but some popular and mostly used file formats are supported. These are MP3, AMR and WAV file formats as well.

Supported Video Formats:


Card recovery is able to recover your lost videos that are captured by camera or mobile device. Card recovery supports lots of video file formats that are mostly used by camera and mobile phone manufactures. These video file formats are AVI, MPG, MP4, MOV, ASF, 3GP, MTS and more. These videos of memory card can be recovered easily without wasting valuable time of user and spending more money to purchase expensive data recovery software.

Application Details

Size: 826 KB
Version: 6.10
License: Freeware
Platform: Windows
Developer: Card Recovery
Memory Card Data Recovery Software Free Download

Available link for download

Saturday, December 17, 2016

Making your Ubuntu 7 10 Desktop look like MAC OS X Leopard

Making your Ubuntu 7 10 Desktop look like MAC OS X Leopard


Making your Ubuntu 7.10 Desktop look like MAC OS X Leopard

READ THE UPDATED VERSION OF THIS ARTICLE FOR UBUNTU 8.04 HERE


MAC OS has been traditionally known for their impressive graphical interface and stability . Now even though i have been an avid Linux follower over the past 9 years I have been using Linux , still i find my self attracted to MAC OS .
Now even though these days its possible to run Hackintosh on normal Intel hardware , but still its not stable and well there are hardware compatibility issues . So well other alternative to using MAC OS is either to purchase MAC hardware(which would be naturally expensive) and run full fledged MAC OS or you could tweak and customize your Ubuntu desktop to look more like MAC OS X .

In this tutorial i describe step by step how to make your ubuntu desktop look more like MAC OS X Leopard :) .


Step 1 :- Downloading LeopardX Icon Theme

First you need to download LeopardX theme (hosted on gnome-looks.org) from the following website : -

or you could download directly from this link :

http://rapidshare.com/files/73251200/LeopardX-V2.6.tar.gz

Gnome - Looks page : http://gnome-look.org/content/show.php/LeopardX?content=64070

It will download a file named
LeopardX-V2.6.tar.gz , now extract this file using file-roller to any temporary directory that you would use to house the files we would be using for the customization.(In my case its $HOME/Leopard) or if you want to use console application you could use the following command to extract the file to Leopard directory (Make sure you create the directory before doing this step)

For me to extract the file to $HOME/Leopard directory(already created) command would be : -

tar -xvzf LeopardX-V2.6.tar.gz $HOME/Leopard

2. Downloading Mac4Lin GTK Theme

Now similarly download Mac4Lin GTK theme from the following website and extract it to the folder created above ($HOME/Leopard)


Download : http://rs18.rapidshare.com/files/71511264/Mac4Lin_GTK_Aqua_v0.3.tar.gz

and to extract it to $HOME/Leopard director(already created)

tar -xvzf Mac4Lin_GTK_Aqua_v0.3.tar.gz $HOME/Leopard

3. Download Cursor Theme Package

We need to download the cursor set for our new theme , you can download the cursor set from t he following website :

http://gnome-look.org/content/show.php/Shere+Khan+X?content=57588


After downloading the cursor set extract cursors to the directory created in the first step.

4. Combining the Downloaded Files into a Single Theme Package

Now after completing the above steps go to the directory( cd $HOME/Leopard for me ) in the Terminal and issue the following command to combine the three theme files into a single .tar.gz archive .
tar cvfz MyTheme.tar.gz LeopardX Mac4Lin_GTK_Aqua_v0.3 Shere_Khan_X/


5. Installing Theme Package
Now to install the theme package we have created in the above step , go to
(System -> Preferences -> Appearance) and click Install and point to our newly created MyTheme.tar.gz archive.

This should start installing the theme package (Cursors/Icons/Theme) once installation is completed . Chose Custom in theme and click on Customize .You will find a window like this:
Customize Dialog Box
In this window in Icons chose LeopardX , in Controls Mac4Lin_GTK_Aqua_v0.3 , in Window Border Mac4Lin_GTK_Aqua_v0.3 and in Pointers White Cursor .


If you have followed the steps properly the theme and icons should have been installed , and you should be able to see the new theme applied to your default desktop .


6. Changing the Log In Screen / GDM Theme


To change the Log In Screen/GDM Theme download the package from website listed below :
http://gnome-look.org/content/show.php/OSX+Session+Login?content=68346

After downloading the package , open (System -> Administration -> Log in Window ) and there go to Local and click on Add and point to the downloaded theme package (osx-login.tar.gz) . Now you would find OSX-Login theme listed in the window , select OSX-Login and close the window . Logout and Login again you should find the new theme installed .

Log-in Window allows easy changing of the Login Screen Theme


7. Enabling Compiz-Fusion

IMPORTANT : - Enabling Compiz-Fusion is essential if you want to use Screenlets , Avant Window Manager Properly .

Unlike previous releases of Ubuntu where one had to manually download and install compiz,beryl etc (Compiz Fusion is composite window manager that provides best features of Compiz and Beryl) from Repositories if one wanted to have glitzy visual effects .

Ubuntu 7.10 comes with Compiz Fusion pre-installed and on supported hardware offers a wide array of Visual Effect . Now depending on graphic hardware of computer one could chose from three level of Visual Effect (From
System -> Preferences -> Appearance )

None : - This mode causes Ubuntu to use Metacity instead of Compiz Fusion , with no visual effect


Basic : - Has only simple visual effects like shadows , fading windows-menus etc


Advanced : - Recommended for PC with descent graphic hardware , enables effects like wobbly windows, transparency , animated workspace switching etc
Visual Effect Dialog Box


However , compiz-fusion is capable of much more and you can enable more desktop effects /customize compiz by typing the following command in the terminal window : -
sudo apt-get install compizconfig-settings-manager
After completing above step , you can customize compiz by going to System > Preferences > Advanced Desktop Effects Settings .
After installation is over , open Terminal from (Applications -> Accessories -> Terminal ) and issue the following command to install emerald which is necessary for using themes in compiz .

sudo apt-get install emerald


After installation is over download MacOS X Emerald theme from this link : http://gnome-look.org/content/show.php/Mac4Lin+Leopard+Emerald+Theme?content=68409

Now open (System -> Preferences -> Emerald Theme Manager )

After Emerald theme manager opens click on import and point to the downloaded theme package from withing the Theme Manager , you will find Mac4Lin Theme listed select the theme , click on refresh and quit the application .

Emerald Theme Manager


8. Installing Avant Windows Navigator

IMPORTANT : - To use AWN Compiz-Fusion should be up and running as mentioned in the step above


Avant Windows Navigator is cool little tool that allows you to have a cute looking dock at the bottom of the screen . Even though AWN is still very buggy, still because it is so feature rich and cool looking you could install it .

Before we begin installing first ensure Software Sources are in order by going to ( System -> Administration -> Software Sources ) go to the Updates and the window should like the image below with in Ubuntu updates box " first , second and fourth option " enabled .

Software Sources Dialog box


To install add in the following line at the end of file /etc/apt/sources.list by opening the gedit editor with the following command .

gksu gedit /etc/apt/sources.list


and LINE TO ADD : -
deb http://download.tuxfamily.org/syzygy42/ gutsy avant-window-navigator
deb-src http://download.tuxfamily.org/syzygy42/ gutsy avant-window-navigator

and after adding the above line issue the following command in the terminal window (Applications -> Accessories -> Terminal )

wget http://download.tuxfamily.org/syzygy42/reacocard.asc -O- | sudo apt-key add -

sudo apt-get update

sudo apt-get upgrade
Now we begin installing AWN by issuing the following command in the terminal window :

sudo apt-get install avant-window-navigator-bzr
and , To install additional applets for AWN

sudo apt-get install awn-core-applets-bzr
Now after completing above mentioned steps AWN should be properly installed , To Launch AWN go to (Applications -> Accessories -> Avant Window Navigator )


Now you could customize AWN by choosing to add more applets , configuring 3D effects for AWN etc by going to AWN Manager (
System -> Preferences -> Awn Manager )


Three ScreenShots of AWN Manager , one with Applets Tab opened and other with Themes tab opened

Though the theme which AWN comes with preinstalled is also good , you might like to try this its cool and very Mac like

http://rapidshare.com/files/71511920/Transparent.tgz.html

you could install this theme through AWN Manager .

This is how my AWN Dock looks(with the above theme installed) like : -


AWN-DOCK

9. Installing Screenlets

IMPORTANT : - To use Screenlets Compiz-Fusion should be up and running as mentioned in the step above

Screenlets gives user a collection of impressive widgets that can be placed on desktop this is similar to feature available on Windows Vista and Mac OS X Dashboard , it gives impressive look to the desktop.
To install Screenlets type in the following command in the terminal window :

First we need to add repository where the Screenlets binary is located , to do so open gedit with superuser permission by typing the following command in the terminal window :

gksu gedit /etc/apt/sources.list


and add the following line at the bottom of the file :

deb http://download.tuxfamily.org/screenlets gutsy screenlets
Now quit the gedit text editor and type in the following command in the terminal window :

sudo apt-get update

sudo apt-get install screenlets
Now , After the installation is over you can add Widgets/Screenlets on your desktop by going to (System -> Preferences -> Screenlets ) , you will find a dialog box like this from where you could add Screenlets onto the desktop .
Screenlets configuring dialog box


10. Getting MAC OS X Leopard Wallpaper

Finally you can get MAC OS X Leopard wallpaper from the following website : http://appleology.com/images/space-desktop.png


Finally this is how my desktop looks after all the tweaking and installing : -

My Ubuntu Desktop

and


Another screenshot showing Menu in the AWN Dock


Technorati Tags:
Ubuntu, Themes, Ubuntu Themes, Mac OS X, Ubuntu Customization, Linux, Desktop Linux, compiz, beryl


Article Written by : Ambuj Varshney (blogambuj@gmail.com)
For Desktop on Linux Blog , http://linuxondesktop.blogspot.com
(C) 2007 , Ambuj Varshney


Available link for download

Tuesday, December 6, 2016

MainType 7 0 0 Build 1012 Full Crack

MainType 7 0 0 Build 1012 Full Crack


MainType 7.0.0 Build 1012 Full Crack
MainType 7.0.0 Build 1012 Full Crack merupakan software yang dapat kamu gunakan untuk mengelola font yang terdapat di dalam laptop sobat. Dengan menggunakan software ini sobat bisa melihat info dan juga pengaturan penting dari font yang terdapat dalama laptop sobat. Dan sobat juga dapat mengelompokkan font tersebut sesuai dengan kategori yang dinginkan. Jadi tunggu apalagi, segera miliki software ini selagi gratis.
Key Features
Install, uninstall, load and unload fonts
Preview and browse fonts on any drive or directory without installation
Full Unicode support
Character grid with Unicode block navigation
Print and print preview your fonts
Support all popular font formats and more: TrueType, OpenType, TrueType Collections, Postscript Type 1, Vector and Raster fonts
Move, copy, rename and delete fonts
Full drag and drop support
Insert character to background application
Font export wizard generates a html based overview of all your fonts

Size : 17 MB / ZippyShare
Download : MainType 7.0.0 Build 1012 Full Crack
Password : software gratis-skw

Cara Install :

  • Download dan ekstrak file “MainType 7.0.0 Build 1012 Full Crack” ini.
  • Instal programnya seperti biasa.
  • Buka folder crack dan copy pastekan file maintype yang berada di dalamnya ke folder instalasi program “MainType” di pc anda.
  • Pilih copy and replace.
  • Jalankan programnya dari file crack yang anda copy tersebut.
  • Selesai

Available link for download

Monday, December 5, 2016

Mengaktifkan Remote Desktop pada Windows 7 atau Vista

Mengaktifkan Remote Desktop pada Windows 7 atau Vista


Mengaktifkan Remote Desktop pada Windows 7 atau Vista - untuk pengguna windows7 atau vista, unutk mengenal beberapa fasilitas yang di sedikan oleh os ini, anda kudu membaca dan mempraktekan bagaimana si fasilitas ini bisa dengan mudah di gunakan, mungkin dengan bertanya atau dengan membaca dari sumber yang benar atau dari tutorial seperti yang ane tulis ini.


Untuk tahap - tahap yang akan anda lakukan sebenarnya cukup mudah seperti tutorial yang akan di bahas di bawah ini :


  • Mengaktifkan Remote Desktop pada Windows 7 atau Vista


Available link for download

Sunday, December 4, 2016

Menonaktifkan Otomatis Update Di Windows 7

Menonaktifkan Otomatis Update Di Windows 7


Apa itu Otomatis Update ? Otomatis update/automatic update merupakan download yang berjalan secara otomatis pada windows ketika komputer/pc sedang terhubung ke internet.
 Sebenarnya bukan windows 7 aja yang memiliki automatic update, Termasuk juga windows Xp dan windows lainnya. Banyak kerugian yang sering timbul jika otomatis update ini tidak di non-aktifkan, Salah satu contoh jika update tidak dimatikan yaitu loading pada Pc akan terasa lambat.Jika hal ini terus anda biarkan,maka dapat mempersulit hardisk pada pc anda bekerja. dan jika Update otomatis ini tidak segera di matikan, pekerjaan andapun serasa tidak memuaskan lagi karena lambatnya sistem di laptop/pc anda
Untuk itu saya memberikan tips untuk menonaktifkan update pada windows anda sehinnga pc yang anda gunakan tetap fit dan loading cepat.
jika update pada pc anda sudah berjalan dan anda ingin menonaktifkan otomatis update ini sebaiknya saya sarankan install ulang dulu laptop anda dan setelah siapp di install Jangan lupa untuk menonaktifkan otomatis updatenya tadi.

Automatic Update Untuk Windows Original

 Beda halnya jika anda mempunyai windows yang original/asli, kalau anda pengguna windows asli/original sebaiknya gunakan update otomatis ini. Karena anda akan selalu diberikan update terbaru oleh Perusahaan Microsoft, Mulai dari Program terbaru, Dukungan perangkat dan lain –lainnya.akan tetapi meskipun anda menggunakan  windows original, Otomatis update ini juga mengganggu pekerjaan anda. tak salah jika anda menonaktifkan update otomatis di windows 7 ini.
 bagi anda pengguna windows versi copyan/ Bajakan alias windows Kw,maka lakukanlah Trik dibawah ini untuk menonaktifkan update otomatisnya:


Langkah-Langkah Untuk Menonaktifkan Automatic Update 
  • Pertama klik kanan icon computer di desktop anda dan pilih properties, kalau tidak ada di desktop klik start, lalu disanan akan terlihat computer kemudian  klik kanan computer tersebut pilih properties.
  • Maka anda akan di tujuikan ke tampilan berikut ini

    Menonaktifkan Automatic Update
  • Disana ada tulisan Device manager Fungsinya untuk melihat Perangkat yang terpasang di computer anda, Remote setting,system Protection dan yang lainnya termasuk windows update.
  • Setelah anda menemukan windows update,klik dan tampil seperti ini

    Menonaktifkan Automatic Update
  • Pilih Change a setting, kita akan di antar pada tampilan berikut 
  • Pada  Change setting ini, terdapat beberapa pilihan yang diberikan oleh windows. Diantaranya: Install update automatic, download update,check for update,dan Never check for update
    Install update automatically artinya : Jika kita memilih ini maka ketika ada koneksi internet, windows akan otomatis melakukan update pada windows anda.
    Download Updates bt let me choose artinya : anda diberikan pilihan untuk update windows anda
    Check for updates but let me choose artinya : Windows akan melakukan update dengan pilihan yang anda berikan sebelumnya.
  • Pilih yang Never check for update (untuk mematikan update otomatisnya).

    Menonaktifkan Automatic Update
  • Kemudian Klik Tombol Ok
Itulah cara yang perlu anda lakukan untuk menonaktifkan update otomatis di windows 7, tujuannya sebenarnya masih banyak, Dengan mematikan updatenya, Kecepatan koneksi internet anda akan semakin cepat karena berhentinya download otomatis pada windows anda.

Anda Ingin mengedit Foto menjadi Video di windows 7 ?
silahkan menuju artikel ini Movie maker untuk windows 7 dan windows 8

Sekiranya Artikel yang saya bagikan ini bermanfaat buat anda semoga anda terbantu. Jangan lupa berkomentar ya sobat .


Available link for download

Saturday, December 3, 2016

mengembalikan File Extension Windows 7 yang hilang

mengembalikan File Extension Windows 7 yang hilang


Semalam ketika buka flash disk dari laptop, tiba-tiba seluruh icon sorchut aplikasi pada desktop windows 7 berubah menjadi icon bergambar mozilla firefox. seluruh aplikasi dibuka menggunakan mozilla. usut punya usut katanya OS terserang virus boraks. akhirnya hal ini mengharuskan saya unruk bertanya dengan mbah google dan akhirnya menemukan solusinya.
langkah untuk mengembalikan ekstension windows 7 yang hilang terkena virus:
  1. lihat ekstensi file aplikasi pada windows explorer ( kasus yang saya temukan seluruh aplikasi bertipe exe file, bukan aplication)
  2. coba lihat file apa saja yang hilang pada control panel-->default program-->current default.
  3. untuk mengembalikan ekstensi yang hilang dapat didownload pada link dibawah ini..
     
 3GP - Audio and video container format developed by the 3rd Generation Partnership Project (3GPP); designed as a multimedia format for transmitting audio and video files between 3G cell phones and over the Internet; commonly used by mobile phones that support video capture. The default program is Windows Media Player.

3GPP - Audio and video container format developed by the 3rd Generation Partnership Project (3GPP); designed as a multimedia format for transmitting audio and video files between 3G cell phones and over the Internet; commonly used by mobile phones that support video capture. The default program is Windows Media Player.

ani - Windows animated cursor file.

aspx - A file with the ASPX file extension is an ASP.NET Source file.

asf - Advanced Streaming Format (ASF) is an open file format specification for streaming multimedia files containing text, graphics, sound, video, and animation. The default program is Windows Media Player.

asx - Advanced Stream Redirector (.asx) play list files, also known as Windows Media Metafiles, are text files that provide information about a file stream and its presentation. The default program is Windows Media Player.

AudioCD - Audio CD protocol associations.

avi - Audio Video Interleave files. The default program is Windows Media Player.

bas - BASIC source code file.

bak - Usually used to rename a file extension with to make it a backup copy. bak as no associations by default, so this will remove all associations for the bak file extension.

bat - Batch files.

bin - Binary file. By default in Windows 7, .bin files are not associated to be opened by a default program.

bmp - Bitmap image files. The default program is Windows Photo Viewer.

Briefcase - New Briefcase file.

cab - Cabinet files.

chm - Microsoft compiled HTML help files.

cmd - Windows command script files.

com - MS-DOS application files.

Contact - Contact file. Default program is Windows Contacts.

cpp - Program source code written in the C++ programming language; may be a standalone program or one of many files referenced within a programming project; can be viewed with a text editor, but most software development programs will display the text with helpful syntax highlighting

css - Cascading Style Sheet Document file. The default program is Notepad.

cur - Windows File Cursor animation files used for the Microsoft Windows mouse pointer image.

dat - Generic data file created by a specific application; typically accessed only by the application that created the file; may contain data in text or binary format; text-based DAT files can be viewed in a text editor.

db - Data base file.

dic - The .DIC file extension is a Dictionary file (text file) which can be used as an alternate dictionary on top of the Microsoft Windows Dictionary and may contain an optional set of personalized words which the user has opted to add for spell- checking purposes.

Directory - Directory protocol associations

dll - A Dynamic Link Library (dll) file is a support file used by one or more programs.

drive - Drive protocol associations.

dvr-ms - Microsoft Recorded TV Show file. The default program is Windows Media Center.

exe - Executable application files.

folder - Folder protocol associations.

gif - GIF (Graphics Interchange Format) image files. The default program is Internet Explorer.

gz - Usually associated with Gzip. By default, there is no associated program for this in Windows 7.

h - C or C++ program language header file normally with .C or .CPP file. In computer programming, particularly in the C and C++ programming languages, a header file or include file is a file, usually in the form of source code, that is automatically included in another source file by the compiler. Typically, header files are included via compiler directives at the beginning (or head) of the other source file.

hlp - Help file

hta - HTML (Hypertext Mark-up Language) application. The default program is Microsoft (R) HTML Application host (mshta.exe)

htm - HTML (Hypertext Mark-up Language) document files. The default program is Internet Explorer.

html - HTML (Hypertext Mark-up Language) document files. The default program is Internet Explorer.

ico - Icon files. The default program is Windows Photo Viewer.

img - CD or DVD image file, essentially equivalent to an ISO file.

inf - Setup information files. The default program is Notepad.

ini - The INI file type is primarily associated with Initialization/Configuration File. These files are typically ASCII text with various configuration options set into sections.

iso - Image file.

jnt - Journal document file. Default program is Windows Journal.

jpe - JPEG (Joint Photographic Experts Group) image files. The default program is Windows Photo Viewer.

jpeg - JPEG (Joint Photographic Experts Group) image files. The default program is Windows Photo Viewer.

jpg - JPG (Joint Photographic Group) image files. The default program is Windows Photo Viewer.

js - Java Script files. The default program is Microsoft Windows Based Script Host (C:WindowsSystem32wscript.exe).

library-ms - Library folder.
lnk - Shortcut link (LNK) files.
log - LOG is a file extension associated with Log files. It is a text file.

M2T- High-definition video recording format used by many HD camcorders; commonly referred to as "HDV;" uses MPEG-2 compression to store HD video data on DV or MiniDV tapes; supports resolutions of 720p and 1080i.

M2TS - Blu-ray BDAV Video File. Video file saved in the high-definition Blu-ray BDAV format; used for saving video data on Blu-ray discs; based on the MPEG-2 transport stream and supports 720p and 1080i formats. BDAV stands for "Blu-ray Disc Audio/Visual," while the M2TS extension refers to "MPEG-2 Transport Stream."

m3u - The M3U file type is primarily associated with MP3 Playlist File. Generally known as a "Winamp" Playlist file, this format has been adopted by a wide variety of MP3 players. The default program is Windows Media Player.

M4V - MPEG-4 file extension used for videos downloaded from the Apple iTunes store; includes TV episodes, full-length movies, and music videos; similar to an .MP4 file, but may be copy-protected using Apples FairPlay DRM copyright protection.

mkv - A Matroska Multimedia Container file is a video format similar to the .AVI, .ASF, and .MOV formats. By default Windows 7 does not have support for opening this file type and has no association. DivXPlayer is a good free program to install that does support playing this file extension. This download will set this file extension back to the default unassociated state in Windows 7.

mov - Movie file. The default program is Windows Media Player.

mp3 - MP3 sound format file. The default program is Windows Media Player.

mp4 - MPEG-4 movie file. The default program is Windows Media Player.

mpa - MPEG audio file. The default program is Windows Media Player.

mpe - MPEG movie file. The default program is Windows Media Player.

mpeg - MPEG (Moving Picture Experts Group) video file. The default program is Windows Media Player.

mpg - MPEG video file. The default program is Windows Media Player.

msc - Mirosoft Common Console document files.

msi - Microsoft Windows Installer installation package file.

msp - Microsoft Windows Installer Patch file.

MTS - MadTracker 2 Sample File. High-definition MPEG Transport Stream video format, commonly called "AVCHD" (Advanced Video Codec High Definition); used by Sony, Panasonic, and other HD camcorders; based on the MPEG-2 transport stream and supports 720p and 1080i HD video formats. MTS files can typically be opened and edited using the software included with Sony and Panasonic HD camcorders. The default program in Windows 7 is Windows Media Player.

otf - Open Type Font file. The default program is Windows Font Viewer.

Package - Package protocol.

pbk - Dial-Up Phonebook file. The default program is Remote Access Phonebook.

pdf - Portable Document Format (PDF) is a file format created by Adobe Systems. By default, Windows 7 does not support reading this file type. Using this to restore the default PDF association in Windows 7 will remove all associations for the pdf file extension. You will need to install a 3rd party program like Adobe Reader or Foxit Reader to be able to open and read pdf files in Windows 7.

png - Portable Network Graphics (PNG) is a bitmap compression method for image files. PNG supports 16.7 million colors, it is lossless and also supports index color, grayscale, true color, transparency, and is streamable. It is thus the best compression method (better than GIF or JPEG) for use on the web.

ps1 - Microsoft Windows PowerShell command line shell and scripting language file. The default program used to open with is Notepad.

psd - The PSD file format, created by Adobe, contains graphics/photos created by image editing software such as Adobe Photoshop.

reg - Registry file.
NOTE: You may need to set the default program as Registry Editor (C:Windows egedit.exe) for reg file extensions, or enable regedit before you will be able to use this REG file.

rtf - Rich Text document files. The default program is WordPad.

scr - Screen Saver files.

tar - Tape Archive file. By default, there is no associated program for this in Windows 7.

themepack - A .themepack file is a Windows Theme Pack file.

tif - Tagged Image files Format. The default program is Windows Photo Viewer.

tiff - Tagged Image files Format. The default program is Windows Photo Viewer.

tmp - Temp file. By default, this file extension does not have a program associated with it.

TS - Video Transport Stream file used for storing video on a DVD; compresses video data using standard MEPG-2 (.MPEG) video compression. TS files are often saved as multiple files on a DVD, i.e. "moviename1.ts," "moviename2.ts," "moviename3.ts," etc. They can be played back by various software DVD players and video editing tools

ttf - True Type font file. The default program is Windows Font Viewer.

TTS - A .tts file is a text file (an ini file) that corresponds to your book. The ToolBook Translation System (TTS) creates the .tts file for you when you set the books TTS Identifier through the Setup Sources window.

txt - Text document files. The default program is Notepad.

url - Internet website shortcut link. The default program is Internet Explorer.

vbs - Visual Basic Script files. The default program is Microsoft Windows Based Script Host (C:WindowsSystem32wscript.exe).

vob - Movie data file from a DVD disc, typically stored in the VIDEO_TS folder; contains the majority of data stored on the disc including video, audio, and subtitles; usually formatted as an MPEG-2 system stream and can be opened by various video playback programs.

wav - Wave audio file. The default program is Windows Media Player.

wma - Windows Media Audio files. The default program is Windows Media Player.

wmv - Windows Media Audio/Video file. The default program is Windows Media Player.

wsf - Windows Script Files. The default program is Microsoft Windows Based Script Host (C:WindowsSystem32wscript.exe).

xml - Excel Macro files. The default program is Internet Explorer.

xps - XML Paper Specification document files. The default program is XPS Viewer (C:WindowsSystem32XPSViewerXPSViewer.exe).

xsl - A eXtensible Stylesheet Language file that defines the style of text, tables, and other objects within a XML document; similar to a .CSS file used by .HTML documents. The default program is Internet Explorer.

zip - ZIP file extensions is a archival and data compression format used to compress one or more files to reduce the size of the file. The default program is Compressed Folders.


Available link for download